|
Table of Contents
Note: For technical information on Global DecisionMaker such as data dictionary, visit the Data Integration Toolkit site and view the related links on the Data &
Product Interpretation section of the Online Documentation page. If prompted to log in, use your
Global DecisionMaker ID and password.
Introduction, Section 1
What is Global DecisionMaker? |
The Global DecisionMaker application at www.dnbdecisionmaker.com is a powerful ASP (Application Service Provider) solution developed by D&B to automate your
global decisioning process. A web-based user interface provides easy access to the Rules Management System for customizing your global risk policy. A powerful
rules engine combines D&B's global data with your own customized rules to produce real-time decisions. The Data Integration Toolkit can be used to
integrate a customized Global DecisionMaker solution into your own website or risk management application.
|
Why use Global Decision-Maker? |
E-Commerce Applications: Facilitate a wealth of online transactions by integrating decisions delivered via Global DecisionMaker into all your e-commerce
applications.
Speed: Automate and accelerate credit decisions in real-time, at the point of a transaction. Pre-screen customers and approve credit quickly, pre-empting your
competitors by closing sales fast.
Reduce Cost: Reduce development costs and time to market by leveraging Global DecisionMaker, a web-based ASP application, and the XML integration
technology of the Data Integration Toolkit.
Consistency: Use Global DecisionMaker to implement a consistent and objective risk policy throughout your organization.
Empower: Empower distributed resources throughout your organization to make instant decisions based on a centrally established and managed risk policy.
Reduce Risk: D&B's predictive scores validate and assess the detailed and complex relationships between the available data to predict the likelihood of a
company suffering financial stress or paying debts in a severely delinquent manner.
Trust: Base your decisions on D&B's trusted global business information and trade with confidence, empowering you to identify and maximize opportunities
while minimizing risk.
Customer Satisfaction: Process applications quickly and efficiently to approve your customers' applications on demand, resulting in increased cash flow and
profitability.
|
How does Global DecisionMaker work? |
Simply set your own decision strategy within Global DecisionMaker by customizing the risk policy rules supplied, so that automated transactions take place only
if the decision meets your pre-determined level of risk.
Global DecisionMaker will instantly and accurately identify a business and bring together all the available information from D&B's global database of over 73
million businesses worldwide. It will then compare this against your carefully defined decision-making criteria and deliver your decisions, determining whether
applications should be accepted and on what terms.
|
Is it easy to implement? |
The Global DecisionMaker application has been designed to make it easy for you to customize and implement your global risk policy by providing generic guidelines
for each country. The predefined guidelines evolved from D&B's vast experience in customizing credit limits across a wide range of industry segments, sizes and
countries. These generic guidelines provide predetermined benchmark recommended limit matrices (decision tables), segmented by Risk Bands, Industry groups and
Sizes. Use the D&B default rules to begin making decisions immediately, or use them to help you implement an effective and competitive risk management process by
customizing or combining them with your own custom rules to meet your specific needs.
|
What are the access options? |
Once you set your decision strategy, you can use the Data Integration Toolkit to integrate your customized solution into your own website or in-house risk
management application. Alternatively, you may wish to view the output via a report, which can be delivered on the Global DecisionMaker website. Or,
increase productivity by delivering decisions directly into the hands of your teams using wireless technology. For more information about accessing Global
DecisionMaker from your wireless PDA or phone, see the Wireless Reference Guide.
However you choose to work, you will have access to other D&B reports and Data Integration products for in-depth information if further analysis is required.
|
Back to Table of Contents
Security & Access Privileges, Section 2
Overview |
This section describes all of the security options/privileges that will provide you with the ability to control who can access Global DecisionMaker and what
their level of access will be.
|
Access the Website & Application |
In order to access and use Global DecisionMaker,the following must happen:
- Receive a Data Integration Toolkit / GDM User ID
- Register a Web Access ID and password
Please follow the steps below depending on the category you fall into.
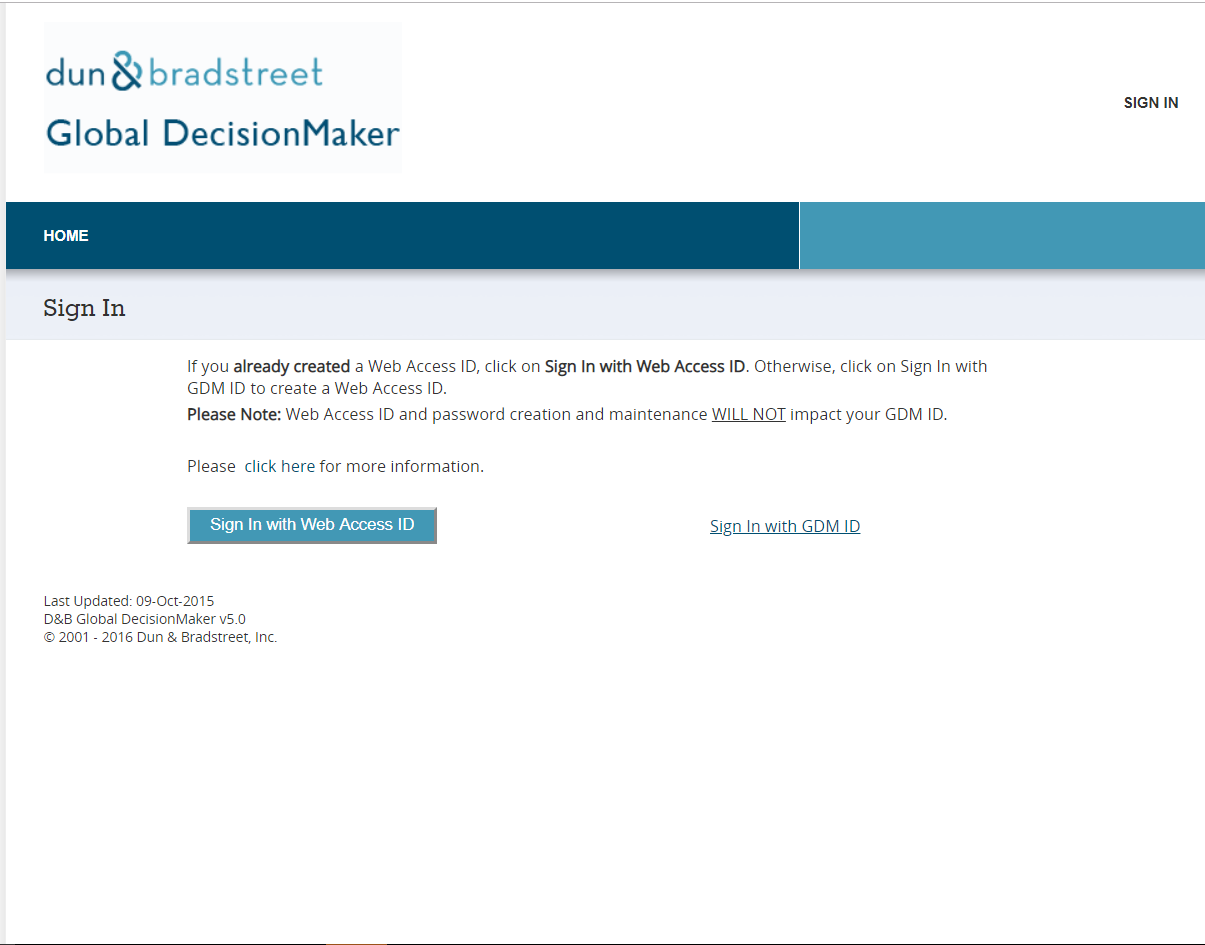
If you do not have a Web Access ID:
- Navigate to Global DecisionMaker
- Click "Sign In with Tookit User ID" and enter your Toolkit/GDM user ID
- Upon successful login, specify your Web Access Id and Password and click "Submit"
- Enter your First Name, Last Name, Country, Language and click "Submit"
- After successful registration, sign in using your new Web Access ID
If you already have a Web Access ID:
- Navigate to Global DecisionMaker
- Click "Sign with Web Access ID" and enter your Web Access Id and password
Once you successfully log in, you can begin making decisions with the Global DecisionMaker application.
NOTE - If you do not have a valid Toolkit/GDM User ID and Password, contact your local D&B representative. For all other inquiries, follow the Customer Support procedures on the Data Integration
Toolkit website at http://toolkit.dnb.com.
|
Password Standards |
D&B values your security and privacy and for that reason, your Global DecisionMaker has been enhanced with the following standards:
- Passwords must be:
- Password rules are as follows:
|
|
Login with Web Access ID
Forgot Password / Locked Out
Change Profile / Password
|
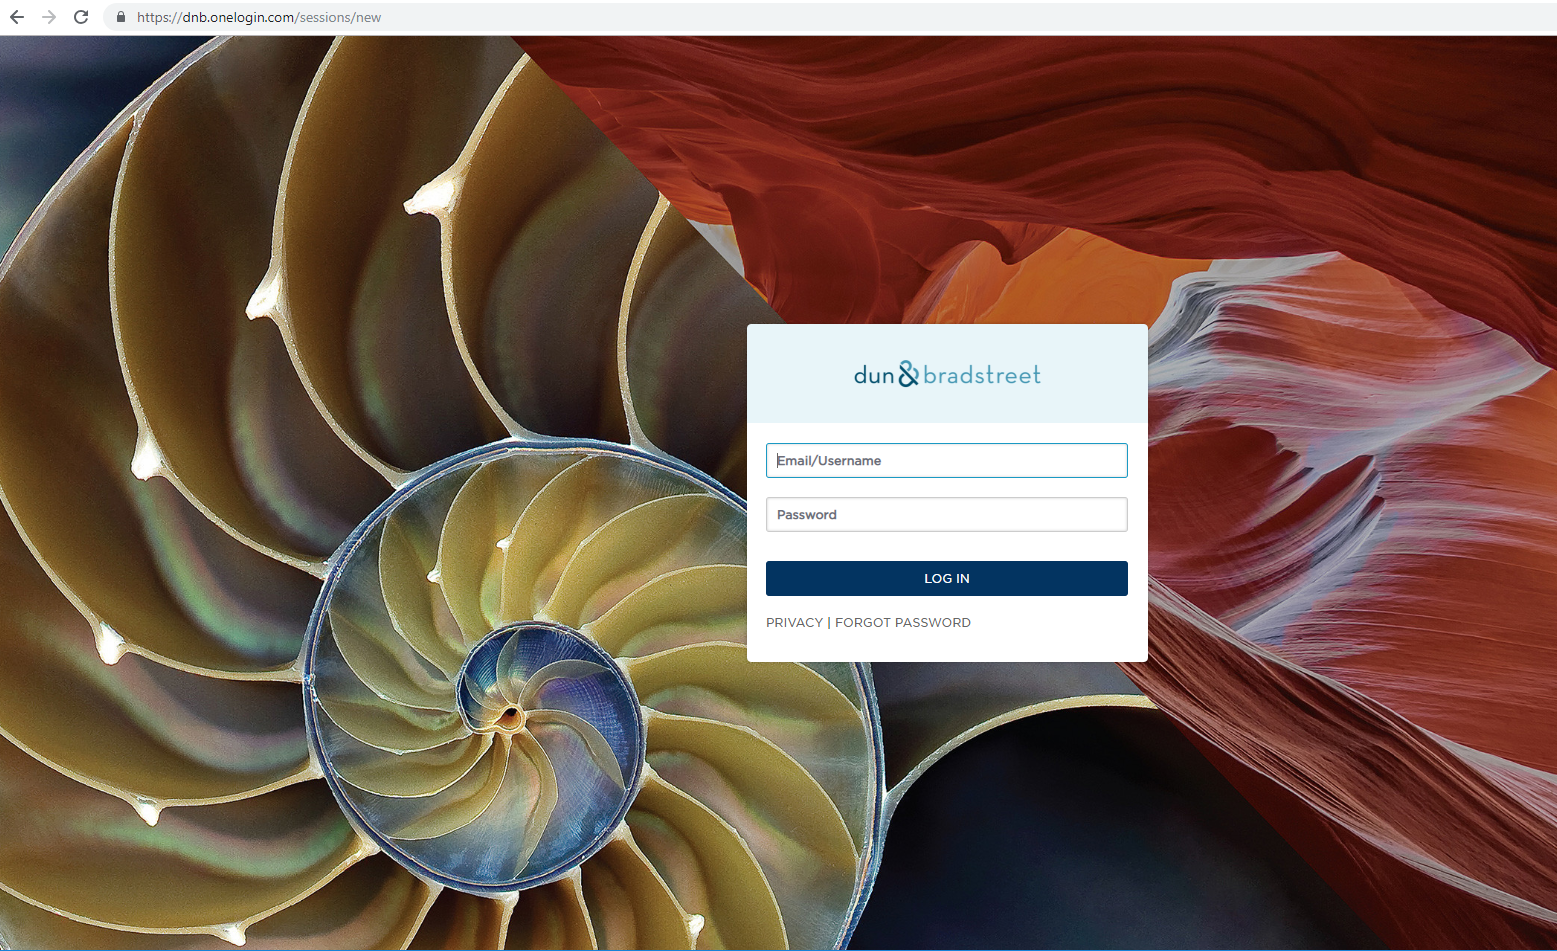
Web Access ID users can click "Sign with Web Access ID" to to access Global DecisionMaker. Upon login, D&B validates your permission and will grant access accordingly.
Forgotten Password
If you have forgotten your password, click "Sign with Web Access ID" and click "FORGOT PASSWORD" to start the password reset process. You will receive an email with instructions on how to reset the password.
Locked Out
If you have attempted to sign in more than 9 times, your Web Access ID will be locked out. You can attempt to log in again after 30 minutes.
Change Password
To change your Web Access ID or password,simply log into Global DecisionMaker with your current Web Access ID. Then click "Modify Profile/Change Password" on the top navigation bar and modify your profile/password accordingly.
If you attempt to sign in with an expired password, you will be instructed to click the Change Password link to enter a new password. Please note that you cannot use the same password as your prior 5 passwords.
|
Data Products |
In order to generate a decision from the Global DecisionMaker application, a User must be granted permission to order Global DecisionMaker data products.
There are three data product options available from the Global DecisionMaker application:
Global DecisionMaker (available to existing customers only) – A report utilizing commercial information that provides a quick decision and basic
information. Global DecisionMaker Plus – A report utilizing commercial information that provides a quick decision plus the detailed data driving the decision. -
GDM Small Business – A report that provides a quick decision utilizing both commercial and consumer data, basic commercial
information, up to 125 consumer data elements per principal used to make the decision and the full consumer text report. Risk class, percentile and commentary are
also provided.
Permission must be granted for each of these additional products in order to access them via Global DecisionMaker:
- Business Verification
- Vendor Management
- Quick Check
- Business Information Report
This provides management the ability to pre-define the data products that can be ordered by each User.
|
Rules Management |
Global DecisionMaker’s Rules Management System enables you to implement your risk policies, and grant permission to other Users
within your business who may also create, edit, view, and update existing rules.
|
Make Decisions |
In order to make decisions, a User must be granted permission to Make Decisions.
|
|
Create
New
Rules/Edit Rules
|
In order to access the Rules Management system and create new rules, a User must be granted permission to Create/Edit Rules.
In order to access the Rules Management system and edit existing custom rules, a User must be granted two levels of permission:
Data Integration User ID privilege to Create/Edit Rules If they did not create the rule, Global DecisionMaker application permission to edit the rule by the Rules Creator.
|
|
View
Rules
|
The Rules Management system provides you with the ability to grant permission within your organization to those associates that will need to review the rules behind a
decision, but are not authorized to change them. Additionally, a User with View Rules permission will be able to view all transactions made using the rule byy all
users.
In order to access the Rules Management system and view a rule, a User must be granted two levels of permission:
Data Integration User ID privilege to View Rules Global DecisionMaker application permission to View Rules by the Rules Creator
|
|
Review and Update
Decisions
|
Global DecisionMaker’s Data Mart provides you with the additional capability of reviewing, updating and exporting prior decisions and Global
DecisionMaker data products.
In order to access the Data Mart, a User must be granted two levels of permission:
Data Integration User ID privilege to View History/Update Decisions Global DecisionMaker application permission to Update/Review History by the Rules Creator
For D&B’s default rules, Users can only view and update their own decisions. If a manager wishes to view decisions for a group of Users that will be using a
D&B default rule, they must save the D&B Default Rule with a new name under their ID and grant User permissions.
|
Country Availability |
In order to manage access to country information from the application, a User can be granted access permission in Data Integration Toolkit for specific
countries. This provides a management option to pre-define the countries from which decisions can be ordered for each User.
|
GDM Small Business Availability |
GDM Small Business functionality is granted in Data Integration Toolkit. In order to Make Decisions using GDM Small Business, the GDM Small Business product must
be turned on for Users in their User ID profile.
|
Testing Toolkit Implementation |
It is very important to understand that when implementing Global DecisionMaker with the Data Integration Toolkit, Test IDs should only be used to test the
implementation of the Toolkit. Do not use a Toolkit Test ID for implementing rules within Global DecisionMaker. If a Test ID is used to implement a rule set, the
rules will be lost when the Test ID expires.
In order to test the implementation of a Toolkit, a User must be granted a Test ID by Data Integration Toolkit administration and follow the standard Toolkit test
procedures.
Global DecisionMaker has a test harness for testing rule sets. Your production User ID should be used for this testing.
|
Back to Table of Contents
Global DecisionMaker Website, Section 3
Making Decisions, 3.1
Overview |
The Global DecisionMaker website is a user-friendly option for making decisions via the Global DecisionMaker application.
|
Global DecisionMaker Data Products |
There are three data decisioning product options available from the Global DecisionMaker website:
Global DecisionMaker – A report utilizing commercial information only that provides a quick decision and basic information. Global DecisionMaker Plus – A report utilizing commercial information only that provides a quick decision plus the detailed data driving the
decision. GDM Small Business – A report that provides a quick decision utilizing both commercial and consumer data, basic commercial information, up to 125
consumer data elements per principal used to make the decision and the full consumer text report. Risk class, percentile and commentary are also provided.
The Global DecisionMaker and Global DecisionMaker Plus data products are only available in the countries where D&B generic Risk Bands have been
defined. GDM Small Business is only available in the U.S. for decisions on U.S. businesses.
Note: To learn about the details behind D&B’s Predictive Scores and Generic Credit Limits, please refer to Sections 10 and 11.
|
| Risk Bands Defined |
Generic risk bands have been created for the following countries. |
| Andorra |
Finland |
Monaco |
Sweden |
| Australia |
France |
Netherlands |
United Kingdom |
| Austria |
Germany |
New Zealand |
United States |
| Belgium |
Ireland |
Norway |
Venezuela |
| Canada |
Italy |
Portugal |
|
| Columbia |
Japan |
San Marino |
|
| Denmark |
Luxembourg |
Spain |
|
|
Additional
Products available via GDM
|
The Global DecisionMaker website also provides access to these additional data products in all countries where they are available from the Data Integration
Toolkit:
- Business Verification
- Vendor Management
- Quick Check
- Business Information Report
|
Getting Started |
In order to access the Global DecisionMaker website, a User must be granted a User ID and access permission. All Users must log in with their User ID &
Password. Once a User ID & Password have been successfully validated for Global DecisionMaker permission, access to the website is granted.
If your User ID is GDM Small Business enabled, a pop up screen will appear at the start of each session containing a Permissible Purpose agreement. This
agreement governs the uses of consumer data. Click the "I Agree" button to confirm acceptance of the terms as outlined in the Permissible Purpose agreement and proceed
into the application. If you do not wish to accept the terms of the agreement, click the "I Disagree" button. You will still proceed into the Global DecisionMaker
application but will be unable to conduct Small Business transactions.
Note: If you find yourself logged into someone else's ID, that User probably used Global DecisionMaker on the same computer and did not log out at the end of
their session. Just select the "Sign In" link from the menu on the left side of the website, and then log yourself in using your ID and password.
If several people are using Global DecisionMaker on the same computer, we strongly recommend selecting the "Sign Out" link at the end of each session. This
protects the privacy of each User and integrity of the Decision Data Mart.
|
Make Decision |
Follow the steps below to make a Decision:
|
|
Step
|
Action
|
|
1
|
Once you have successfully logged onto the Global DecisionMaker website, you can begin the decision making process by selecting the "Company Search" navigation
button that brings you to the Company Search screen. There are three options available to you for looking up the company you wish to inquire upon:
- Company Name
- DUNS Number
- Phone Number
Select the option for entering your company search criteria by selecting the appropriate tab.
|
|
2
|
If the selection is "Company Information" the User is required to input:
- Company Name
- State/Providence/Region
Optional fields are:
- Address
- City/Town
- ZIP/Postal Code
If the selection is "D-U-N-S® Number", the User is required to input a valid 9 digit D-U-N-S® Number.
If the selection is "Phone Number", the User is required to input the "Country" and a valid "Telephone Number".
|
|
3
|
Enter your name or endorsement in the "Your Billing Reference" field in the upper right hand corner of the screen. This billing reference will appear as the endorsement
on your D&B Usage Statement.
For Market Place transactions in which Global DecisionMaker is not being used for inquiries, the User ID will appear on the usage statement.
Note: Only alphanumeric characters, A-Z or 0-9, can be entered in this field. Do not use spaces or punctuation.
|
|
4
|
After entering the appropriate search criteria click "Submit."
|
|
5
|
Global DecisionMaker performs a search of D&B’s global database and returns a list of potential company matches for the User to select from on the
Search Results screen.
Also a Fraud Risk Score is returned for the input search criteria. The Fraud Risk Score, available in US only, is a powerful, predictive score that is designed to help
credit issuers easily assess the potential fraud risk of a new business credit applicant.
The Fraud Risk Score leverages the Global Data Collection, Entity Matching, and Predictive Indicator Drivers of D&B's Quality Assurance Process,
DUNSRight™.
Once activated, the Fraud Risk Score will automatically be generated through the input of applicant company Name and Address data. It will be calculated
real-time based on several sources of newly identified predictive data. A number of these sources, as well as the predictive algorithms and model, are proprietary to
D&B.
The Fraud Risk Score will be delivered as a separate packet and will require system enhancements prior to implementation.
From the Search Results screen, the User can:
Select one of the companies returned by clicking on it. This will take you to the Available Products screen. Select the product you wish to order by clicking
on it. This will take you to the Make Decision screen, where you will enter your transaction information. Bypass the Available Products screen and proceed directly to the Make Decision screen by clicking the product link to the right or your company
selection. Order a consumer only Small Business Risk Account Score by clicking on "Principal Information Only". This will take you to the Principal Information
screen. - Return to the Search screen to modify the search criteria by clicking the "Back" button on your browser.
|
|
6
|
From either the Search Results screen or the Available Products screen, select a Global DecisionMaker data product:
- "Global DecisionMaker"
- "Global DecisionMaker Plus"
- "Small Business Risk Account Score"
|
|
7
|
If you click on "Global DecisionMaker" or "Global DecisionMaker Plus" you will go directly to the Transaction Information screen.
If you click on "Small Business Risk Account Score", you will go to the Principal Information screen, an additional input screen where you will add information
on the business’ principals. Required fields are:
- First Name
- Last Name
- Street Address (home)
- State (home)
- Zip code (home)
- Social Security Number
You can inquire on up to two principals per business.
|
|
8
|
You can enter information on one or two Principals by clicking on the appropriate tabs. After entering Principal Information, click on the "Proceed to Product Order"
button. This will take you to the Transaction Information screen.
|
|
Ordering a Commercial Only Small Business Risk Account Score
|
You can order a commercial only Small Business Risk Account Score by clicking on "Skip Entering Principal Information, and Proceed to Product Order". No consumer data
will be used in the decision.
Note: If you do not add any principal information and click on the "Proceed to Product Order" button at the bottom of the screen, you will get an error message
prompting you to fill in missing information.
|
|
Make Decision Input Screen
|
Once you have selected the data product and entered Principal Information if ordering the Small Business Risk Account Score, the Transaction Information screen
appears. It is important to note that all currency must be entered as Internationalized Numeric whole values without spaces, punctuation, symbols, or special
characters.
Note: If ordering the Small Business Risk Account Score, you must enter USD for U.S. Dollars.
Enter the Transaction Information for the Decision as follows:
|
|
Step
|
Action
|
|
1
|
Select the Risk Policy Rule to apply to the decision in the "Risk Policy Rule" field. You have two options:
- Select nothing and use the default rule previously defined
- Select a different "Risk Policy Rule" from the drop-down list
Note: If any component of a rule has been updated to a new version, the system will not automatically select the newest version for a previously defined composite risk
policy. You must explicitly state which version to use in a new composite rule and designate it as the default if necessary.
|
|
2
|
Enter the Transaction ID you want attached to the decision in the "Transaction ID" field. You have two options:
- Enter your own Transaction ID, up to 16 characters, to be used as an identification code for your decision. This will appear on the report.
- Enter nothing, it will be populated with a D&B generated Transaction ID.
|
|
3
|
Enter currency in the "Currency field" by selecting a currency type from the drop-down menu.
Note: Currency should match the recommended limit currency in the composite rule.
|
|
4
|
In the "Requested Amount" field, you have two options:
- Enter the amount of the transaction to be approved.
- Enter nothing and the decision will be based on the limit defined in your decision rules.
Note: In the application the ‘Requested Amount’ is compared to the 'Recommended Limit' and translated to a 'Decision' that is reflected in an 'Action'. For
example, if the ‘Requested Amount’ is greater than the ‘Recommended Limit’ that has been defined for the Risk Band, the outcome may be a "Pending"
decision that has an action "Refer to Corporate Credit Manager".
|
|
5
|
In the "Outstanding Balance" field, you have two options:
- Enter the outstanding amount previously approved for this company, and it will be factored into the decision.
- Enter nothing and the decision will be based just on the "Requested Amount".
|
|
6
|
Enter "Custom Defined Input" Fields, if necessary.
|
|
7
|
Click "Make Decision".
Note: If you select a Branch, the decisions will always be made at the Headquarter level. Global DecisionMaker will always trade up to the Headquarters for
decisioning.
|
|
8
|
The Global DecisionMaker decisioning engine will process your inquiry and deliver a decision based upon your rules, D&B's Global information, consumer
information (for Small Business Risk Account Score), and the transaction information you entered. Following is a Global DecisionMaker report with a decision to
"Reject" due to a High Risk band.
|
|
9
|
When the decision is returned there are four options:
- Order additional products on the same company for further analysis by clicking on the "Additional Products Available" link. This will return the User to the
Available Products screen.
- If the User has "Update Decisions" permission, they can update the decision by clicking on the "Update Decision" link.
- Print the report by clicking on the "Printer Friendly Report" link. When the printer friendly report displays on a pop up screen, select "Print" from the "File" drop
down menu and change the page orientation to landscape.
- Process a new decision by clicking on "Company Search" on the navigation bar.
|
Review Decisions, 3.2
|
Overview
|
Global DecisionMaker captures every GDM decisioning transaction and stores them in a Data Mart for 120 days. This provides the additional capability of
reviewing, managing, and updating prior decisions.
This powerful tool enables a User to:
- View all prior decisions
- Update decisions previously made
- Analyze the effectiveness of your Risk Policy
- Download prior decisions for further analysis
|
|
Getting Started
|
In order to access the Data Mart a User must be granted permission. The User ID must have Update Decisions/View History privilege set within the Global
DecisionMaker application.
Access the Data Mart by following the steps below:
|
|
Step
|
Action
|
|
1
|
Once you have successfully logged onto the Global DecisionMaker website, start by selecting "Review Decisions" on the navigation bar. This brings you to
the Review Decisions screen, where there are two options:
- "Review All Decisions" within a selected date range
- "Review Pending Decisions" within a selected date range
|
|
2
|
Enter the date range to be reviewed.
|
|
3
|
Up to 25 records will be displayed on your screen. To view additional transactions, go to the bottom of the spreadsheet and click on the "Next" button to view the next
group of transactions. Click on the "Previous" button to view the previous screen.
|
|
4
|
Once you are in the Data Mart you have additional options:
|
|
Option
|
Description
|
|
Change Search Date
|
Click on "Change Search Date". This brings you back to the Review Decisions screen where you can change the date range.
|
|
Sort By
|
|
|
|
|
|
|
|
|
|
|
|
|
|
|
|
|
|
|
|
Sort Order
|
Sort decisions in "Descending" or "Ascending" order.
|
|
Review Details
|
Review details of the decision by clicking on "Review Details". This will bring up the original GDM data product used to make the decision.
|
|
Download
|
- Download the entire history selection into a spreadsheet by clicking on either "Download Small Business Data" or "Download GDM Data".
If you download Small Business Data, all consumer bureau information, D&B data and scoring aggregate is exported.
If you download GDM Data, only D&B’s commercial information contained in the GDM or GDM Plus reports is exported.
|
Update Decisions, 3.3
|
Overview
|
In addition to reviewing decisions previously made, Global DecisionMaker provides you with the ability to update all decisions previously made. This is a
valuable feature for Pending decisions, which upon review can be rejected or approved to complete your decision process.
|
|
Getting Started
|
In order to update decisions, a User must be granted two permissions:
- User ID privilege to Update Decisions/View History.
- Permission to Update/Review Decisions for the specific Risk Policy Rule, which is granted by the creator of the rule.
Update decisions by following the steps below:
|
|
Step
|
Action
|
|
1
|
Once you have successfully logged onto the Global DecisionMaker website, Start by selecting "Review Decisions" on the navigation bar. This brings you to the
Review Decisions screen. There are two options:
- "Review All Decisions" within a selected date range
- "Review Pending Decisions" within a selected date range
|
|
2
|
Enter the date range to be reviewed.
|
|
3
|
By selecting "Review Pending Decisions", only the Pending decisions for the time range appears in the Data Mart.
|
|
4
|
Click on "Review Details" in the Decision Status column on the row of the case to be reviewed for updating. The Review Details screen will appear.
|
|
5
|
At this time the User can click on "Additional Products Available" to order and review additional information.
|
|
6
|
To update the decision, click on "Update Decision".
|
|
7
|
Update the Decision by checking "Accept" or "Reject".
|
|
8
|
Enter any comments to appear on the updated decision in the input box.
|
|
9
|
Enter the approved amount (numbers only).
|
|
10
|
Click on "Set" and the new decision will be updated, or select "Cancel" and no changes to the decision will be made.
|
|
11
|
Click on the "Return to Review Decisions" link to return to the Data Mart.
|
Back to Table of Contents
Manage Risk Policy, Section 4
Rules Management System Overview, 4.1
|
Overview
|
Global DecisionMaker contains a user-friendly rules management wizard to help you implement your risk policy into the application. You can use the pre-defined
default rules built into the application, create your own rules, or combine the two.
Within the Rules Management system you can:
- Select the countries to which your rules will apply
- Set the criteria for exception handling
- Define your tolerance for risk by establishing risk classes using D&B's predictive scores
- Set credit limits for application processing
- Provide decision and action messages to drive decisions into actions
- Determine who within your organization has access to which rules
Furthermore, you have dynamic access to your risk policy so you can update it at any time.
|
|
Compo-nents
|
The Rules Manager consists of the following components:
- High Level Exceptions
- Manage Risk Bands
- Manage Recommended Limits, Decisions & Actions
- Special Handling Rules
- Custom Input Data
- Risk Policy Rule Grouping & Administration
- Test Rules
|
|
Creating and Editing Rules
|
In order to access the Rules Management system, a User must have permission to create and edit rules. This allows you to:
- Create your own rules, or combine them with the pre-defined default rules
- Grant permission to Users to use rules
- Set criteria for exception handling
- Define tolerance for risk by creating risk bands
- Define credit Limits, Decisions and Actions
- Grant access privileges to your rules to other Users in your business
|
High Level Exceptions, 4.2
|
Overview
|
In High Level Exceptions, you have the ability to define and prioritize criteria for exception processing. Exception processing automatically assigns a Reject or
Pending decision to new applications, regardless of additional information or factors that would normally be considered. High Level Exceptions are over-ride rules that
take precedence over your risk policy.
|
|
D&B's Default
High Level Exceptions
|
The High Level Exception default rules and priorities established by D&B for each country are based on historical business trends and predictive scores. D&B
does not define any consumer based High Level Exception rules in the Default rule group. The default rules established by D&B are listed below and apply to GDM and GDM
Plus data products only. They will automatically return a Reject or Pending decision if any of the following criteria are met:
|
|
Priority
|
Decision
|
Rule
|
Definition
|
|
1
|
Reject
|
All Countries
Out of Business
|
Our information indicates this business is no longer active at this location.
|
|
2
|
Reject
|
All Countries
Financial Embarrassment
|
Currently there is record of open bankruptcy, receivership, liquidation, discontinuance with unpaid obligations, or equivalent in D&B's files.
|
|
3
|
Reject
|
Australia
Dynamic Risk
Score Override
|
The subject is in financial distress: external administrator or receiver manager appointed, in liquidation, scheme of arrangement, out of business, mortgagee in
possession, criminal investigation.
|
|
4
|
Reject
|
Australia
Zero Dynamic Delinquency
|
The subject is in Liquidation, or Out of Business.
|
|
5
|
Reject
|
US
Zero Delinquency Score
|
This business has been designated as Discontinued at this Location, in Open Bankruptcy, or Higher Risk.
|
|
6
|
Reject
|
New Zealand
Zero Delinquency Score
|
The subject is in Under External Administration or Out of Business.
|
|
7
|
Reject
|
Australia
Zero Dynamic
Risk Score
|
The subject is in Financial Distress.
|
|
8
|
Reject
|
US
Zero Failure
Risk Score
|
This business has been designated as Discontinued at this Location, in Open Bankruptcy, or Higher Risk.
|
|
9
|
Reject
|
Europe
Severe Negative Information
|
Our information indicates severe negative information about this business.
|
|
10
|
Pending
|
Europe
(Except UK, IE)
New Business
|
D&B has identified this as a new business. Refer for further analysis.
|
|
11
|
Pending
|
Germany
New Business
|
D&B has identified this as a new business. Refer for further analysis. D&B credit recommendation:
[MAX_CR_CRCY_CD] [MAX_CR]
|
|
12
|
Reject
|
UK
Special Information
|
D&B has identified special information about this business and does not recommend credit.
|
|
13
|
Reject
|
UK, IE (Ireland)
Miscellaneous Override Code
|
D&B has identified special information about this business and does not recommend credit.
|
|
14
|
Pending
|
UK, Ireland
New Business
|
D&B has identified this as a new business. Refer for further analysis.
|
|
15
|
Pending
|
Europe
Minimal Data
|
Limited information is available for this company. Refer for further analysis.
|
|
16
|
Pending
|
Europe (Except GB, IE, DE) Not Recommended Lines of Business
|
D&B does not recommend automated decisions for organizations in certain lines of business (banks, building societies, financial institutions, insurance
services).
|
|
17
|
Pending
|
Germany Not Recommended Lines of Business
|
D&B does not recommend automated decisions for organizations in certain lines of business (holdings, investment companies).
|
|
18
|
Pending
|
Europe
Foreign Company
|
D&B has identified this as a foreign registered company. An automated decision is not recommended for business with this legal form.
|
|
19
|
Reject
|
Europe
(Except UK, IE)
Miscellaneous Override Code
|
D&B has identified special information about this business and does not recommend credit.
|
|
20
|
Pending
|
Germany
Miscellaneous Override Code
|
D&B has identified special information about this business. Refer for further information. [CURRENCY] [MAX_CR]
|
|
21
|
Pending
|
Nordic
Insufficient Information
|
D&B does not have sufficient information to provide a decision on this business.
|
|
22
|
Pending
|
Nordic
Further Review
|
Please refer for further review. The D&B Rating is [DNB_RTG].
|
|
23
|
Pending
|
Spain
Negative
Net Worth
|
Negative net worth. Refer for further analysis.
|
|
24
|
Reject
|
Italy
Risk Indicator = 4
|
The D&B Risk Indicator indicates a high level of risk. Do not extend credit.
|
|
25
|
Pending
|
Austrian - Weak Balance Sheet
|
D&B has identified an overall weak condition of the balance Sheet. Refer for further analysis.
|
|
26
|
Pending
|
Austrian - Weak Parent Company
|
D&B has identified that the parent company is in a financially weak condition. Please refer for further analysis.
|
|
27
|
Pending
|
Austrian - Poor Trend and Sector
|
The Risk indicator was mainly affected by the falling trend and high risk of the business sector. Please refer for further analysis.
|
|
28
|
Pending
|
Failure Risk Score = Null
|
D&B has no Failure Risk Score for this company. Please order a business information report for more information or contact your local customer services.
|
|
D&B's Optional Exception Rules
|
Optional High Level Exception rules are provided to give you additional rules with which to customize your Risk Policy. These rules were established by D&B
based on historical business trends and predictive scores, and are housed in "Choose From List".
Note: Since D&B does not define default rules for the Small Business data product, the above global D&B Default High Level Exception rules will appear in the
Choose From List as Optional High Level Exception rules, along with the Optional High Level Exception rules listed below:
|
|
Decision
|
Rule
|
Definition
|
|
Pending
|
Presence of Suits or Judgments
|
Our information indicates this company has a presence of suits and/or judgments.
|
|
Pending
|
Age < 4
|
Our information indicates this company has been in business less than four years.
|
|
Pending
|
Age < 3
|
Our information indicates this company has been in business less than three years.
|
|
Pending
|
Age < 2
|
Our information indicates this company has been in business less than two years.
|
|
Pending
|
Age < 1
|
Our information indicates this company has been in business less than one year.
|
|
Pending
|
Negative Net Worth
|
Our information indicates this company has negative net worth.
|
|
Getting Started
|
To define a new or edit an existing High Level Exception rule group, follow the steps below:
|
|
Step
|
Action
|
|
1
|
Click on "Manage Risk Policy" on the navigation bar on the left side of your screen. This will bring you to the Manage Risk Policy screen.
|
|
2
|
Click on "High Level Exceptions". This will bring you to the Manage Risk Policy: High Level Exceptions screen, where you have three options:
- "Edit" - Edit an existing High Level Exception rule group
- "Create New" - Create a new High Level Exception rule group
- "View Printable" - View all existing rule group s in a printer friendly format
|
|
Edit
|
To edit an existing High Level Exception rule group, highlight the group and click the "Edit" button. This will bring you to the High Level Exceptions Rule Group that
you want to edit, where all the individual rules that comprise that rule group are displayed. You can edit, delete or add new rules to the rule group. Follow the same
instructions below for creating a new group, starting with "Options".
|
|
Create New
|
To create a new High Level Exception rule group, click the "Create New" button. This will bring up the Manage Risk Policy: High Level Exceptions
screen where multiple rules will be displayed. These rules will be invoked unless you opt not to include them in your new group.
For GDM and GDM Plus, the list of rules that displays consists of D&B’s Default High Level Exceptions listed above.
For GDM Small Business, the list of rules that displays is as follows:
|
|
Decision
|
Rule
|
Definition
|
|
Reject
|
Out of Business
|
Our information indicates this business is no longer active at this location. Do not extend credit. For further information please order a Business Information Report.
If you have reason to believe this business is currently operating, please contact our D&B Support Team via https://service.dnb.com/.
|
|
Reject
|
Financial Embarrassment
|
Currently, there is record of open bankruptcy, receivership, liquidation, discontinuance with unpaid obligations or equivalent in D&B files.
|
|
Reject
|
US - Zero Delinquency Score
|
This business has been designated as "Discontinued at this location", in "Open Bankruptcy" or "Higher Risk".
|
|
Reject
|
US - Zero Failure Risk Score
|
This business has been designated as "Discontinued at this location", in "Open Bankruptcy" or "Higher Risk".
|
|
Reject
|
Zero Small Business Risk Account Risk Score
|
This business has been designated as "Discontinued at this location", in "Open Bankruptcy" or "Higher Risk".
|
|
Reject
|
Business Deterioration – Small Business
|
Information received within the past 90 days indicates conditions may exist which could significantly impact future operation of the company, therefore a Small Business
Risk Account Score could not be calculated.
|
|
Reject
|
Business Deterioration – Delinquency
|
Information received within the past 90 days indicates conditions may exist which could significantly impact future operation of the company, therefore a Commercial
Credit Score could not be calculated.
|
|
Reject
|
Business Deterioration – Failure
|
Information received within the past 365 days indicates conditions may exist which could significantly impact future operation of the company, therefore a Financial
Stress Score could not be calculated.
|
|
Pending
|
Contact Subscriber on Credit Bureau
|
Please specify an action step based on your small business policy.
|
|
Pending
|
File Variation on Credit Bureau
|
Please specify an action step based on your small business policy.
|
|
Pending
|
Lost or Stolen Card on Credit Bureau
|
Please specify an action step based on your small business policy.
|
|
Pending
|
Disputed Account on Credit Bureau
|
Please specify an action step based on your small business policy.
|
|
Pending
|
SSN/SIN Variation on Credit Bureau
|
Please specify an action step based on your small business policy.
|
|
Pending
|
Abnormal Report Indicator
|
Please specify an action step based on your small business policy.
|
|
Pending
|
Bureau Not Found
|
Please specify an action step based on your small business policy.
|
|
Pending
|
Months Since Most Recent Delinquency
|
Please specify an action step based on your small business policy.
|
|
Pending
|
Total Revolving/Open Balances
|
Please specify an action step based on your small business policy.
|
|
Pending
|
Total Outstanding Installment Loan Balances
|
Please specify an action step based on your small business policy.
|
|
Pending
|
Online Credit Bureau Score 1
|
Please specify an action step based on your small business policy.
|
|
Options
|
From this screen you have the following options:
|
|
Option
|
Description
|
|
Add
New Exception
|
Clicking on the "Add New" button brings up the criteria builder to create a new High Level Exception rule.
|
|
Choose From List
|
Clicking on the "Choose From" button brings up a list of all of the D&B High Level Exception rules – both rules used in D&B’s Default Rule group as
well as Optional rules that are not part of D&B’s Default Rule Group but can be used to create a new rule group. The rules that are already in the rule
group being edited/viewed will not be displayed in the Choose From list.
|
|
Priority
|
By clicking on the drop down menu in the Priority column you can change the priority setting. The High Level Exceptions will re-sort according to the priority order you
select.
|
|
Remove
|
By clicking on the "Remove" link to the right of the rule, you will remove it from the rule group.
|
|
Edit
|
By clicking on the "Edit" link to the right of the rule, you will bring up the criteria builder populated with the conditions of the rule, which you can then edit.
|
|
Choose From List
|
By clicking on the "Choose From List" button, the list of D&B’s Optional Exception Rules will appear. You can select an Optional Exception to be added to a
rule group by clicking on the "Description" link. All Optional Exceptions that are currently in the rule group of exceptions that you are editing/viewing will not be
displayed in the Choose From List.
|
|
Add New Exception
|
By clicking on the "Add New" button, the High Level Exception criteria builder will appear and you will be able to define your own Exception rule. Follow the steps
below to create a new High Level Exception rule.
|
|
Step
|
Action
|
|
1
|
In the "Description" field, provide a descriptive name for the new High Level Exception rule. Do not use any punctuation.
|
|
2
|
Select the first "Data" field that you want to use in your rule from the drop down list.
Note: Commercial data elements are listed first, Consumer elements are listed second, and User-defined custom input data elements are listed third.
|
|
3
|
Select the "Condition" that you want to use in your rule from the drop down list, e.g., =, >, <, etc.
|
|
4
|
Enter a "Value" for your condition. If using the value of "Null" the operator should be set to "Is".
|
|
5
|
Click the "Add to Condition" button to add your selections to the Condition Box. Repeat process to add new fields.
|
|
6
|
Use the "And Or ( )" buttons to the right to further define your condition statement if necessary, or type them in the box.
- Be sure to use the ( ) to surround logical operations that should be grouped together to ensure correct processing order.
- If you choose to "Add to Condition" and would like to use the Or operator, be sure to remove the And operator.
|
|
7
|
Select a "Decision" from the drop down list.
|
|
8
|
Type in the "Action Message" or click the "Select From List" button to drop down a list of predefined actions to select from.
Note:
- If a variable is used in the Action message, the field content must be enclosed in brackets. i.e., Approve up to [CR_LMT]
- The case of the field content must mirror the case used in the Customer Input Fields. i.e., ALL CAPS or all lower case.
- D&B variables are always in upper case. i.e., [REQ_CR_AMT]
|
|
9
|
By clicking "Save", the new rule will be added to the list of High Level Exceptions as priority one.
|
|
Note
|
When creating new rules it is important to consider the impact they will have. For example: If a rule for Negative Net Worth is written as (NET_WORTH < 0)
this will also include those cases for which a value for Net Worth is not available. Therefore, a better way to create it is (NET_WORTH < 0) Or (NET_WORTH is
NULL).
|
|
Priority
|
All new High Level Exceptions added to the rule group will appear as priority one at the top of the rule group. To change the priority of an Exception Rule within
the group, select a new priority from the Priority drop down box to the left of the rule. All other Exception rules will adjust accordingly.
|
|
Remove
|
To remove a High Level Exception rule from the rule group, click on the "Remove" link to the right of the rule. If it is a D&B rule it will be saved in the
Choose From List.
|
|
Edit
|
Once you have created a new High Level Exception rule, you will be able to edit it by clicking on the "Edit" link to the right of the rule. This will bring up the
criteria builder for you to modify the rule. You cannot edit D&B High Level Exception rules.
|
Manage Risk Bands, 4.3
|
Overview
|
The Manage Risk Bands option is used to establish bands, or classes, of risk based on a User's tolerance for risk.
When evaluating businesses utilizing the Global DecisionMaker and Global DecisionMaker Plus data products, the scores used and the number of Risk Bands available vary
by country, depending on which scores are available and which are the most predictive in a particular country. Risk Bands are determined by the location of the
company being reviewed, i.e. if you’re evaluating a company in the U.S., the U.S. Risk Bands will be used to make the risk assessment and credit
recommendation. You can adjust for risk tolerance by changing the default ranges for each Risk Band, and define Risk Band Overrides when specific conditions are
met. These new customized bands can be saved as a new risk band rule. The Risk Bands for D&B's Generic Recommended Limit Guidelines are set at five levels: High,
High to Moderate, Moderate, Low to Moderate and Low. You can define as little as two, or up to the maximum number of Risk Bands available for a particular
country.
When evaluating small businesses utilizing the Small Business Risk Account Score data product, risk assessments can only be performed on U.S. businesses, as the U.S. is
the only country in which this score is available. D&B does not define default rules utilizing the Small Business Risk Account Score due to the use of consumer data in
the score. Once Users define their own small business rules, they can then save them as default, adjust them to align with your risk tolerance, and define Risk Band
Overrides when specific conditions are met.
For more information on measurements of risk, see "A Word About Predictive Scores".
|
|
Generic
Risk Band Availability – GDM and GDM Plus
|
GDM has been designed to make it easy for you to customize and implement your Global Risk Policy by providing generic Risk Band guidelines for the following countries:
|
|
Albania
|
Croatia
|
Italy
|
Netherlands
|
Tajikistan
|
|
Andorra
|
Cyprus
|
Japan
|
New Zealand
|
Turkey
|
|
Armenia
|
Denmark
|
Kazakhstan
|
Norway
|
Turkish Cyprus
|
|
Australia
|
Estonia
|
Kyrgyzstan
|
Portugal
|
Turkmenistan
|
|
Austria
|
Finland
|
Latvia
|
Romania
|
Ukraine
|
|
Azerbaijan
|
France
|
Liechtenstein
|
Russian Federation
|
United Kingdom
|
|
Belgium
|
Georgia
|
Lithuania
|
San Marino
|
United States
|
|
Bosnia And Herzegovina
|
Germany
|
Luxembourg
|
Serbia And Montenegro
|
Uzbekistan
|
|
Bulgaria
|
Gibraltar
|
Macedonia
|
Slovenia
|
Venezuela
|
|
Byelorussia
|
Greece
|
Malta
|
Spain
|
|
|
Canada
|
Iceland
|
Moldova
|
Sweden
|
|
|
Columbia
|
Ireland
|
Monaco
|
Switzerland
|
|
|
D&B's
Risk Bands
|
The predictors of risk used to determine Risk Bands for each country, along with the maximum number of Risk Bands that can be created for each country, are defined
below.
|
|
Country
|
Bands
|
Score(s)
|
|
Albania
|
4
|
D&B Rating®
|
|
Andorra
|
10
|
Failure Risk (Financial Stress) Score (Spain)
|
|
Armenia
|
4
|
D&B Rating®
|
|
Australia
|
10
|
Dynamic Risk Score & Dynamic Delinquency Score
|
|
Austria
|
10
|
Failure Risk Score
|
|
Azerbaijan
|
4
|
D&B Rating®
|
|
Belgium
|
10
|
Failure Risk Score
|
|
Bosnia And Herzegovina
|
4
|
D&B Rating®
|
|
Bulgaria
|
4
|
D&B Rating®
|
|
Byelorussia
|
4
|
D&B Rating®
|
|
Canada
|
10
|
Failure Risk Score & Credit (Delinquency) Score
|
|
Columbia
|
4
|
D&B Rating®
|
|
Croatia
|
4
|
D&B Rating®
|
|
Cyprus
|
4
|
D&B Rating®
|
|
Denmark
|
4
|
Failure Risk Score
|
|
Estonia
|
4
|
D&B Rating®
|
|
Finland
|
4
|
Triple A Rating & D&B PAYDEX® Score
|
|
France
|
10
|
Failure Risk Score
|
|
Georgia
|
4
|
D&B Rating®
|
|
Germany
|
10
|
Failure Risk Score
|
|
Gibraltar
|
4
|
D&B Rating®
|
|
Greece
|
4
|
D&B Rating®
|
|
Iceland
|
4
|
D&B Rating®
|
|
Ireland
|
4
|
D&B Rating®
|
|
Italy
|
10
|
Failure Risk Score & Credit (Delinquency) Score
|
|
Japan
|
10
|
Failure Risk Score
|
|
Kazakhstan
|
4
|
D&B Rating®
|
|
Kyrgyzstan
|
4
|
D&B Rating®
|
|
Latvia
|
4
|
D&B Rating®
|
|
Liechtenstein
|
10
|
Failure Risk Score & Credit (Delinquency) Score
|
|
Lithuania
|
4
|
D&B Rating®
|
|
Luxembourg
|
4
|
D&B Rating®
|
|
Macedonia
|
4
|
D&B Rating®
|
|
Malta
|
4
|
D&B Rating®
|
|
Moldova
|
4
|
D&B Rating®
|
|
Monaco
|
10
|
Failure Risk Score (France)
|
|
Netherlands
|
10
|
Failure Risk Score
|
|
New Zealand
|
10
|
Credit (Delinquency) Score
|
|
Norway
|
4
|
Triple A Rating
|
|
Portugal
|
10
|
Failure Risk Score
|
|
Romania
|
4
|
D&B Rating®
|
|
Russian Federation
|
4
|
D&B Rating®
|
|
San Marino
|
10
|
Failure Risk Score (Italy) & Credit (Delinquency) Score (Italy)
|
|
Serbia And Montenegro
|
4
|
D&B Rating®
|
|
Slovenia
|
4
|
D&B Rating®
|
|
Spain
|
10
|
Failure Risk Score
|
|
Sweden
|
4
|
Triple A Rating & D&B PAYDEX® Score
|
|
Switzerland
|
10
|
Failure Risk Score & Credit (Delinquency) Score
|
|
Tajikistan
|
4
|
D&B Rating®
|
|
Turkey
|
4
|
D&B Rating®
|
|
TURKISH CYPRUS
|
4
|
D&B Rating®
|
|
Turkmenistan
|
4
|
D&B Rating®
|
|
Ukraine
|
4
|
D&B Rating®
|
|
UK
|
10
|
Failure Risk Score & Credit (Delinquency) Score
|
|
US
|
10
|
Failure Risk Score & Credit (Delinquency) Score
|
|
Uzbekistan
|
4
|
D&B Rating®
|
|
Venezuela
|
4
|
D&B Rating®
|
|
Getting Started
|
To view, edit or create a new Risk Band rule, start by going to the Manage Risk Policy: Risk Bands screen by following the steps below:
|
|
Step
|
Action
|
|
1
|
Click on "Manage Risk Policy" on the navigation bar on the left side of your screen. This will bring you to the Manage Risk Policy screen.
|
|
2
|
Click on "Risk Bands". This will bring you to the Manage Risk Policy: Risk Bands screen, where you have three options:
- View a Printable version of a rule
- Edit an existing Risk Band
- Create a new Risk Band
|
|
View/Print Risk Band Rules
|
View and Print existing Risk Band rules by following the steps below.
|
|
Step
|
Action
|
|
1
|
Begin by displaying the rule you want to select from by choosing one of the following display options:
- Most Current
- Last 5 versions
- All versions
|
|
2
|
The appropriate rules will appear in the display box on the right side of the screen.
|
|
3
|
Highlight the rule you would like to view or print in the rule display box.
|
|
4
|
Click on the "View Printable" button.
|
|
5
|
A printable version of the rule you selected will appear.
|
|
US-D&B-UNITED-STATES
Version - 1
Create Date - 12-Oct-01
Created By - D&B
|
| Delinquency |
| Percentile |
| High |
1 |
6 |
| High-Mod |
6 |
19 |
| Moderate |
19 |
57 |
| Low |
57 |
100 |
| Failure Risk |
| Percentile |
| High |
1 |
2 |
| High-Mod |
2 |
5 |
| Low |
5 |
100 |
|
|
Edit Existing Rules
|
Edit an existing Risk Band rule by following the following steps:
|
|
Step
|
Action
|
|
1
|
Begin by displaying the rules you want to select from by choosing one of the following display options:
- Most Current
- Last 5 versions
- All versions
|
|
2
|
The appropriate rules will appear in the display box on the right side of the screen.
|
|
3
|
Select the rule that you want to edit by highlighting it.
|
|
4
|
Click the "Edit" button to bring up the Edit screen, or double click on the rule. A screen will appear with the Risk Scores or other D&B measurements of risk
that were used to define the Risk Bands for the country you selected.
|
|
5
|
The new ranges can be typed in the grid, or adjusted by grabbing the slider tabs for each variable on the X and Y-axis of the graph and moving it until the desired
changes appear in the grid.
|
|
6
|
The example below shows two scores used to define the Risk Bands, the Credit (Delinquency) Score and the Failure Risk Score. On the first tab for the Delinquency Score
the Rates and the Percentiles are displayed. The Rates represent the probability that a customer will pay their bills beyond 90 days. By adjusting the Percentile Limits
for each risk band, the corresponding Rates will adjust accordingly. Once you make changes on the first score, click on the tab for the second score and adjust your
cut offs.
|
|
7
|
Click the "Risk Band Overrides" button to view and/or edit Risk Band Overrides. Instructions for defining Risk Band Overrides are in the Risk Band Override section at
the end of this chapter.
|
|
8
|
When you have finished all of your entries:
- Click the "Save As" button to save your changes with a new rule name. Do not use any punctuation.
- Click the "Save All" button to save your existing rule changes with a new rule version.
- Click the "Reset All" button to reset all of the data and not make any changes.
You cannot edit and create a new version of a D&B default rule. Editing a D&B default rule can only be done by saving as a new rule using the "Save As"
button.
|
|
9
|
If you click "Save As" a pop up screen will appear for you to enter the new rule name. Do not use any punctuation.
|
|
|
|
|
10
|
Your new rule will be added to your list of rule options. If any component of a rule has been updated to a new version, the system will not automatically select the
newest version for a previously defined composite risk policy. The User must explicitly state which versions to use in a new composite rule and designate it as the default
if necessary.
|
|
Creating a New Risk Band Rule – GDM and GDM Plus
|
The Global DecisionMaker application makes it easy for you to create a new Risk Band rule. You can adjust the risk bands according to your tolerance for risk and
name your new Risk Band rule.
When creating new Risk Bands, it is very important to plan to have the number of Risk Bands equal to the number of Risk Bands in the Recommended Limit Matrix. This will
ensure that a limit amount will be defined and match all of the new Risk Bands.
Create a new Risk Band rule by following the steps below:
|
|
Step
|
Action
|
|
1
|
Begin by selecting the country for which you are defining new Risk Bands from the drop down on the Manage Risk Policy: Risk Bands screen.
|
|
2
|
Select the number of risk bands you want from the drop down. You will not be able to select more risk bands than are available for the selected country.
|
|
3
|
Click on the "Create New" button. A screen will appear with the Risk Scores or other D&B measurements of risk that were used to define the Risk Bands for the
country you selected.
|
|
4
|
You can set new ranges by typing them in the grid and hitting the "Enter" key, or by grabbing the slider tabs for each variable on the graph and moving it until the
desired numbers appear in the grid.
|
|
5
|
Once you make changes on the first score, click on the tab for the second score and adjust your ranges.
|
|
6
|
Click the "Risk Band Overrides" button if you want to create an Override. Instructions for creating a Risk Band Override are provided in the next section of this
chapter.
|
|
7
|
When you have finished all of your entries:
- Click the "Save As" button to save your changes with a new rule name. Do not use any punctuation.
- Click the "Reset All" button to reset all of the data and not make any changes.
You cannot edit and create a new version of a D&B default rule. Editing a D&B default rule can only be save as a new rule using the "Save As" button.
|
|
8
|
If you click "Save As" a pop up screen will appear for you to enter the new rule name. Do not use any punctuation.
|
|
9
|
Your new rule will be added to your list of rule options. If any component of a rule has been updated, the system will not automatically select the newest version for a
previously defined composite risk policy. The User must explicitly state which version to use in a new composite rule and designate it as the default if
necessary.
|
|
Creating a New Risk Band Rule – GDM Small Business
|
The Global DecisionMaker application makes it easy for you to create Risk Band rules. When creating new Risk Bands, it is very important to plan to have the
number of Risk Bands equal to the number of Risk Bands in the Recommended Limit Matrix. This will ensure that a limit amount will be defined and match all of the new Risk
Bands.
Create a new Risk Band rule by following the steps below:
|
|
Step
|
Action
|
|
1
|
In the "Country" drop down menu, select "USSB - US Small Business" on the Manage Risk Policy: Risk Bands screen.
|
|
2
|
Select the number of risk bands you want from the drop down. 10 is the maximum number of risk bands available in the U.S., so that is the maximum number of risk bands
you will be able to select.
|
|
3
|
Click on the "Create New" button. A screen will appear with the Small Business Risk Account Score, which is used to define the Risk Bands.
|
|
4
|
The risk Percentiles will be evenly distributed among the risk bands. You can adjust the Percentiles to create new ranges by typing in the grid and hitting the "Enter"
key or by grabbing the slider tabs on the graph and moving them until the desired numbers appear in the grid.
|
|
5
|
Click the "Risk Band Overrides" button if you want to create an Override. Instructions for creating a Risk Band Override are provided in the next section of this
chapter.
|
|
6
|
When you have finished all of your entries:
- Click the "Save As" button to save your changes with a new rule name. A pop up screen will appear for you to enter the new rule name. Do not use any
punctuation. Your new rule name will be prefaced with "US-SB" to denote that it is a Small Business rule.
- Click the "Reset All" button to reset all of the data and not make any changes.
|
|
7
|
Your new rule will be added to your list of rule options. If any component of a rule has been updated, the system will not automatically select the newest version for a
previously defined composite risk policy. The User must explicitly state which version to use in a new composite rule and designate it as the default if
necessary.
|
|
Risk Band Overrides
|
The Risk Band Override component enables you to define criteria to override the risk band rules when your defined conditions are met. Create a new Risk Band
Override rule by following the steps below.
|
|
Step
|
Action
|
|
1
|
Click on the "Risk Band Overrides" button to bring up the Risk Band Overrides screen. If none have been defined, the screen will look like the one
below.
|
|
2
|
Click on the "Add New Override" button to bring up the Risk Band Override criteria builder.
|
|
3
|
In the "Description" field, provide a descriptive name for the new Risk Band Override rule. Do not use any punctuation.
|
|
4
|
Select the first "Data" field that you want to use in your rule from the drop down list.
Note: For Small Business: Commercial data elements are listed first, Consumer elements are listed second, and User-defined custom input data elements are listed
third.
|
|
5
|
Select the "Condition" that you want to use in your rule from the drop down list, e.g., =, >, <, etc.
|
|
6
|
Enter a "Value" for your condition. If using the value of "Null" the operator should be set to "Is".
|
|
7
|
Click the "Add to Condition" button to add your selections to the Condition Box. Repeat process to add new fields.
|
|
8
|
Use the "And Or ( )" buttons to the right to further define your condition statement if necessary, or type them in the box.
- Be sure to use the ( ) to surround logical operations that should be grouped together to ensure correct processing order.
- If you choose to "Add to Condition" and would like to use the Or operator, be sure to remove the And operator.
|
|
9
|
Select a "Decision" from the drop down list.
|
|
10
|
Type in the "Action Message" or click the "Select From List" button to drop down a list of predefined actions to select from.
Note:
- If a variable is used in the Action message, the field content must be enclosed in brackets. i.e., Approve up to [CR_LMT]
- The case of the field content must mirror the case used in the Customer Input Fields. i.e., ALL CAPS or all lower case.
- D&B variables are always in upper case. i.e., [REQ_CR_AMT]
|
|
11
|
Click "Done" to save your new Decision & Action rule.
|
|
12
|
Click "Save" or "Save As" to save your new Recommended Limits Rule. Do not use any punctuation.
Note: You will not be able to use the "Save" command to save a new version of a D&B default rule, you will have to use "Save As" and name your new rule.
|
Back to Table of Contents
Manage Limits, Decisions, & Actions, Section 5
|
Overview
|
The Manage Limits, Decisions & Actions feature provides you with the tools you need to:
- Define your Recommended Limits based on Risk, Industry, and Size segments you establish
- Select a Currency Code
- Apply a Maximum Threshold
- Set Minimum Thresholds
- Define Industry Groups
- Define Decisions an Actions
As with Risk Bands, you can choose the recommended risk limits with pre-populated default limits or you can customize a new matrix according to your Risk Policy
rules.
When creating a U.S. rule, Users can select conservative or aggressive risk limits, based on their overall tolerance for risk.
When creating new Recommended Limits, it is very important to plan to have the number of Risk Bands equal to the number of Risk Bands in the Recommended Limit Matrix.
This will ensure that a limit amount will be defined and match each Risk Band.
|
|
Getting Started
|
Go to the Manage Risk Policy: Recommended Limits screen by following the steps below:
|
|
Step
|
Action
|
|
1
|
Click on "Manage Risk Policy" on the navigation bar on the left side of your screen. This will bring you to the Manage Risk Policy screen.
|
|
2
|
Click on "Manage Limits, Decisions and Actions". This will bring you to the Manage Risk Policy: Recommended Limits screen. There are three options:
- Edit an Existing Rule
- Create a New Rule
- View/Print a rule
|
|
Edit Recom-mended Limits
|
Edit an existing rule by following the steps below:
|
|
Step
|
Action
|
|
1
|
Begin by displaying the rules you want to select from by choosing one of the following display options:
- Most Current
- Last 5 versions
- All versions
The appropriate rules will appear in the display box on the right side of the screen.
|
|
2
|
Select the rule that you want to edit by highlighting it.
|
|
3
|
Click the "Edit" button or double click on the rule to bring up the Edit screen.
|
|
4
|
A matrix with pre-defined limits will appear.
|
|
5
|
There are three views for editing:
- Define Recommended Limits
- Define Industries
- Thresholds
|
|
6
|
Select "Define Recommended Limits" by clicking on the tab. There are four options for editing the Recommended Limits, described below:
|
|
Option
|
Description
|
|
Unit
|
This cannot be changed when editing, the currency code the limits are in will be displayed. Can only be changed when creating new Recommended Limits.
|
|
MAX
|
Change the Maximum Limit by typing it in the MAX box and clicking on the "Apply Max" button. This will adjust Limits in the matrix with the new Maximum Limit
amount. For example, if the new maximum amount entered in the MAX field is 2500, every existing limit in the matrix higher than that will be replaced with 25000.
|
|
Edit/Enter Values
|
Highlight the appropriate cell within the table to change the recommended limit values. Type the value and press the "Enter" key.
Limits must be Internationalized Numeric whole values, without:
- Spaces
- Punctuation
- Symbols
- Special Characters
If not, the cell will be treated as a blank cell in the matrix.
If a variable such as DM_NET_WRTH (DecisionMaker Net Worth) is used in the matrix, brackets should not be used.
|
|
Import Data
|
This function allows you take data from a spreadsheet and drop it into the import data box, which pastes the values into the matrix.
- Click on "Import Data" to bring up the Import screen.
- Highlight the Excel spreadsheet cells and copy them on to your clipboard by using "Control C".
- Paste them into the Import screen by using "Control V".
- Click "Insert" to copy them into the matrix.
All currency must be imported as Internationalized Numeric whole values without spaces, punctuations, symbols, or special characters.
|
|
Create New Recom-mended Limits
|
Use the following steps to customize Recommended Limits for a new rule:
|
|
1
|
Click on "Recommended Limits". This will bring you to the Manage Risk Policy: Recommended Limits screen.
|
|
2
|
Click on the "New Rule" button. This will bring up the Manage Risk Policy: Recommended Limits: Create New screen. If you are creating a Small Business
rule, you must check the "Small Business" box before clicking the "New Rule" button.
|
|
3
|
Enter the following criteria to define your new Recommended Limits:
|
|
Criteria
|
Description
|
|
Number of Risk Bands
|
Enter the number of Risk Bands.
|
|
Limit Currency or Units
|
Select the currency type from the drop down list. If you are creating a Small Business rule, the currency must be in USD.
|
|
Company Size Criteria
|
There are five size Segmentation Elements available for you to select from to further define your Recommended Limits:
- Average High Credit
- High Credit
- Total Employees
- Net Worth
- Sales
Check the "Primary" box and select the Size Segmentation element from the drop down. Indicate the number of size categories. If appropriate, do the same for Secondary
and Tertiary.
|
|
4
|
Click the "Continue" button to bring up the table to set the ranges for the segmentation elements.
|
|
5
|
Enter the ranges and the labels to describe them and click "Continue". If you do not type in Labels, the application will generate generic labels.
|
|
6
|
There are three views for editing your rules to create new Recommended Limits:
- Define Recommended Limits
- Define Industries
- Thresholds
|
Define Recommended Limits, 5.1
Getting Started
|
The "Define Recommended Limits" option is used to apply maximum and minimum limits to specific industry groups as well as the company size criteria the User
defined.
|
|
Step
|
Action
|
|
1
|
Select "Define Recommended Limits" by clicking on the appropriate tab. There will be one to four sub-tabs:
- Secondary
- Tertiary
- Principal Data Driven Limits (Small Business Risk Account Score only)
The number of sub-tabs displayed will vary depending on the number of Company Size Elements you defined and whether or not you are utilizing the Small Business Risk
Account Score to evaluate small businesses using consumer data.
|
|
2
|
Select the "Primary" tab. You will have four options for editing your recommended limits:
|
|
Options
|
Description
|
|
MAX
|
Change the Maximum Recommended Limit by typing it in the MAX box and clicking on the "Apply" button. This will replace Recommended Limits in the matrix with the
new Maximum Recommended Limit amount.
|
|
Edit/Enter Values
|
Highlight the appropriate cell within the table to change the Recommended Limit values.
Limits must be Internationalized Numeric whole values without:
- Spaces
- Punctuation
- Symbols
- Special Characters
If not, the cell will be treated as a blank cell in the matrix.
If a variable such as DM_NET_WRTH (DecisionMaker Net Worth) is used in the matrix, brackets should not be used.
|
|
Import Data
|
This function allows you take data from a spreadsheet and drop it into the matrix, or type values in.
- Click on "Import Data" to bring up the Import screen
- Highlight the Excel spreadsheet cells and copy them on to your clipboard by using "Control C"
- Paste them into the Import screen by using "Control V"
- Click "Insert" to copy them into the matrix
All currency must be imported as Internationalized Numeric whole values without spaces, punctuations, symbols, or special characters. The data will be inserted
into the Recommended Limits matrix.
|
|
3
|
If appropriate, select the "Secondary" and "Tertiary" tabs and repeat the process.
|
|
4
|
If appropriate, select the "Principal Data Driven Limits" tab. You will have two options for editing the Recommended Limits:
- Enter/Edit Values
- Import Data
|
|
4
|
When you have finished all of the recommended limit entries for the new rule:
- Click the "Save As" button to save your changes with a new rule name. Do not use any punctuation.
- Click the "Reset All" button to reset all of the data and not make any changes.
You cannot edit and create a new version of a D&B default rule. Editing a D&B default rule can only be done by saving as a new rule using the "Save As"
button.
|
Define Industries, 5.2
|
Getting Started
|
The "Define Industries" option can be used to customize industry segments and set risk rules for defined industry segments. The industry categories are based on
1987 Standard Industrial Classification Codes (SICs). They can be defined at the four-digit level of detail. Use the following steps to customize Industry
Groups for a selected rule group.
|
|
Step
|
Action
|
|
1
|
After Editing or Creating New Risk Bands and defining the Recommended Limits, select the "Define Industries" tab.
|
|
2
|
To view a complete list of SIC codes to reference, click on the "Lookup Industry" button. A pop-up window will appear with a complete listing of all SIC codes and
their descriptions. Double click on the folder to expand the categories. Click "OK" to return to the screen.
|
|
3
|
Click on the "Insert Row" button to create a new row to add additional Industry Groups. Since the existing table includes full coverage of all SIC codes, remove SIC
codes from the existing groups before attempting to include them in a new group.
|
|
4
|
When adding new rows, type in the new Industry Group name and new SIC ranges when appropriate.
|
|
5
|
Click the "Enter" button after each input into the table to ensure that your changes have been recorded.
|
|
6
|
Click on "Delete Row" to remove an existing group from a rule. Deleted Industry Groups are automatically put into the Other category, which appears at the bottom
of the SIC listings. These limits are set to a value of zero.
|
|
7
|
When you have finished all of your industry changes for the new rule:
- Click the "Save As" button to save your changes with a new rule name. Do not use any punctuation.
- Click the "Reset All" button to reset all of the data and not make any changes.
You cannot edit and create a new version of a D&B default rule. Editing a D&B default rule can only be saved as a new rule using the "Save As" button.
|
Thresholds, 5.3
|
Getting Started
|
The Thresholds option allows Users to input a minimum decision threshold for a selected rule group. Requests that fall below the minimum threshold will automatically be
approved and no decisioning is required except in the case of High Level Exceptions.
This feature also allows the User to define a smallest and largest recommended limit delivered for a selected rule group and a corresponding Action message.
Use the following steps to set decision thresholds for a selected rule group:
|
|
Step
|
Action
|
|
1
|
Select the "Thresholds" tab.
|
|
2
|
Enter the minimum threshold amount in the space provided and the corresponding action message. Decisions for amounts less than this minimum will automatically be
approved, without regard to available data.
|
|
3
|
Enter the smallest recommended limit delivered and the corresponding action message.
|
|
4
|
Enter the largest recommended limit delivered and the corresponding action message. The smallest and largest recommended limits form the upper and lower boundaries of
the limits that can be generated.
|
|
5
|
When you have finished:
Click the "Save As" button to save your customized rule with a new name. Do not use any punctuation. If any component of a rule has been updated to a new
version, the system will not automatically select the newest version for a previously defined composite risk policy. The User must explicitly state which version
to use in a new composite rule and designate it as the default if necessary. - Clicking the "Reset All" button before saving changes returns all values to the previous settings.
|
Decisions & Actions, 5.4
|
Getting Started
|
To create a new rule or rule version by customizing Decisions and Actions, follow the steps below.
|
|
Step
|
Action
|
|
1
|
Click on "Manage Risk Policy" on the navigation bar.
|
|
2
|
Click on "Recommended Limits".
|
|
3
|
Highlight the rule to be edited and click the "Edit" button, or go through the steps to create a new rule.
|
|
4
|
Once you come to the Recommended Limits screen by creating a new or clicking on the "Edit" button, click on the "Edit Decisions/Actions" button at the bottom of
the matrix.
|
|
5
|
This will bring up the Manage Risk Policy: Decision & Actions screen. You can either:
- Edit an existing Decision & Action rule
- Create a New Decision & Action rule
The four rows of Decisions and Actions below indicate that this is a Decision Action table for a rule with four Risk Bands.
|
|
6
|
This screen displays the following information and options:
|
|
Option
|
Description
|
|
Create New
|
Create a new Decision & Action rule.
|
|
Priority
|
Prioritize customized Decision & Actions rules.
|
|
Condition
|
The condition reflects rule or risk band result.
|
|
Recommended Limit is Undetermined
|
This column reflects the Decision & Action if the result is an undetermined Recommended Limit.
|
|
Requested Amount is Not Entered
|
This column reflects the Decision & Action if the Requested Amount was not entered.
|
|
Requested Amount > Recommended Limit
|
This column reflects the Decision & Action if the Requested Amount is greater than the Recommended Limit.
|
|
Requested Amount < = Recommended Limit
|
This column reflects the Decision & Action if the Requested Amount is less than or equal to the Recommended Limit.
|
|
Edit
|
To edit a Decision & Action rule, go to the cell that you want to edit.
- Edit the Decision by clicking on the appropriate new decision: Accept, Pending, or Reject.
- Edit the Action text or select a new Action message by clicking the "Select From List" link and clicking on the message you want.
|
|
Create New
|
To create a New Decision & Action follow the steps below:
|
|
Step
|
Action
|
|
1
|
Click on the "Create New" button. This will bring up the Decision & Action criteria builder.
|
|
2
|
Select the Data Field from the drop down box for your new Decision & Action rule.
|
|
3
|
Select the Condition from the drop down box.
|
|
4
|
Enter the desired value.
|
|
5
|
Click on the "Add to Condition" button to create your condition statement. Repeat as necessary for compound statements.
|
|
6
|
Select a Decision from the drop down box.
|
|
7
|
Type in your Action message or select one from the list by clicking the "Select From List" button and double clicking on the link of the message you want.
If a variable is used in the Action message brackets must be used. For example: Approve up to [CR_LMT].
|
|
8
|
Click "Save" to save your rule or "Cancel" to cancel it. The new rule will appear at the top of the Decision & Actions table as the first priority.
|
|
9
|
Click "Done" to save your new Decision & Action rule.
|
|
10
|
Click "Save As" to save your new Recommended Limits rule. Do not use any punctuation.
|
Back to Table of Contents
Special Handling Rules, Section 6
|
Overview
|
Users may designate specific customers to include in their Special Handling rules. This means that Global DecisionMaker will not make decisions on these
D-U-N-S® Numbers, but will simply provide an Accept decision up to the Override Limit amount, or a Reject when an Override Limit of zero is entered.
Use the following steps to add, edit, or delete companies from the Special Handling Rules list:
|
|
Step
|
Action
|
|
1
|
Click on "Manage Risk Policy" on the navigation bar on the left side of your screen. This will bring you to the Manage Risk Policy screen.
|
|
2
|
Select "Special Handling Rules" from the Manage Risk Policy screen. This will bring you to the Manage Risk Policy: Special Handling screen.
|
|
3
|
Select an existing rule and click "Edit" or "Create New" to create a new rule.
|
|
Create New
|
Create a new Special Handling rule by following the steps below:
|
|
Step
|
Action
|
|
1
|
Click the "Create New" button to bring up the screen to create a new Special Handling rule.
|
|
2
|
Add new companies to the Special Handling list by entering the D-U-N-S® Number in the space provided. If you enter a branch location it will
automatically identify the headquarter DUNS Number, which will be used for the Special Handling rule.
|
|
3
|
Enter the Override Limit indicating the amount to be accepted, or zero for those companies that should be automatically rejected. Enter numeric characters without
punctuation or symbols.
|
|
4
|
Click the "Add Decision/Action" button to bring up the Decision & Actions edit screen. Make the appropriate edits and click "Done" to save.
|
|
5
|
Repeat the steps above for each case to be added to the rule.
|
|
6
|
When you click the "Create" button your new rule will appear with the name of the company.
|
|
7
|
Edit or delete existing rules by clicking the appropriate link to the right of the Override Limit.
|
|
8
|
When you are finished click the "Save As" button to name and save your new Special Handling rule. Do not use any punctuation.
|
Back to Table of Contents
Custom Input Data, Section 7
|
Overview
|
Custom Input is used to define data that will be passed by the Data Integration Toolkit from a User's system to the decision engine, or entered as decision criteria by
an analyst when making a decision on the Global DecisionMaker website. If decisions are ordered via the Global DecisionMaker website, a new input field
will be displayed for the Custom Input field to be entered. Custom Input fields will be returned as part of the decision. Custom Input fields are set at the contract
level, so they will be visible to all Users regardless of who created them. There is no limit to the number of Custom Input fields that can be created.
|
|
Getting Started
|
To go to the Manage Risk Policy: Custom Input screen and define Custom Input fields by following the steps below:
|
|
Step
|
Action
|
|
1
|
Click on "Manage Risk Policy" on the navigation bar on the left side of your screen. This will bring you to the Manage Risk Policy screen.
|
|
2
|
Click on "Custom Input Data". This will bring you to the Manage Risk Policy: Custom Input Data screen.
|
|
3
|
Define the custom input data by entering the following:
|
|
Field/Option
|
Description
|
|
Label
|
The name of the custom field being defined.
|
|
Tag Name
|
An XML tag name can be entered here. If it is not, the system will generate one.
|
|
Type
|
Indicate if it is alpha or numeric.
|
|
Comments
|
Input key information about the field.
|
|
Default Value
|
Enter a default value if necessary.
|
|
Edit/Delete
|
Click "Edit" to edit an existing field, or "Delete" to delete an existing field.
|
|
Add
|
Click "Add" to save your new Custom Input Field.
|
|
4
|
Click on the "Add" button to save the new custom field definition.
|
|
5
|
When used as part of a rule, the new Custom Input field will appear on the Transaction Information screen as a new Customer Defined Input field. In the example
below, High Balance is a Custom Input field.
|
Back to Table of Contents
Risk Policy Rule Grouping & Administration, Section 8
|
Overview
|
The Risk Policy Rule Grouping & Administration feature is used to:
- Specify the individual rule components of your Risk Policy rules.
- Grant access and define user permissions to your Risk Policy rules.
|
Risk Policy Rule Grouping, 8.1
|
Getting Started
|
Go to the Manage Risk Policy: Risk Policy Rule Groupings & Administration screen by following the steps below:
|
|
Step
|
Action
|
|
1
|
Click on "Manage Risk Policy" on the navigation bar on the left side of your screen. This will bring you to the Manage Risk Policy screen.
|
|
2
|
Click on "Risk Policy Rule Grouping & Administration" to go to the Manage Risk Policy: Rule Groups & Administration screen. There are four options:
- Create a "New Rule"
- "Edit" an Existing Rule
- "Administration"
- "View Printable"
|
|
Create a New Rule Group
|
To create a new rule group, follow the steps below:
|
|
Step
|
Action
|
|
1
|
Click the "New Rule" button to bring up the Manage Risk Policy: Rule Groups: High Level Exceptions screen. Click the "Small Business" check box if your new rule
is for assessing small businesses utilizing consumer data with the Small Business Risk Account Score. If you do not check the "Small Business" check box, your Small
Business Risk Bands will not display for you to include in your new rule.
The number "1 – High Level Exceptions" will be highlighted, indicating that you can select a High Level Exception rule for your new Rule Group.
|
|
2
|
Select the High Level Exceptions rule you want to associate with the rule you are editing or creating by checking the appropriate box.
|
|
3
|
When you have finished, select "2 - Risk Band" to bring up the Manage Risk Policy: Rule Groups: Risk Bands screen. The number 2 will be highlighted, indicating
that you can select/deselect Risk Band rule(s) for your new Rule Group.
|
|
4
|
Select Risk Band rules you want to associate with the rule you are editing or creating.
Note: You can only select one Risk Band per country.
|
|
5
|
When you have finished, select "3 - Recommended Limits" to bring up the Manage Risk Policy: Rule Groups: Recommended Limits Screen.
|
|
6
|
Select the Recommended Limits rule you want to associate with the rule you are editing or creating. To help identify the appropriate Recommended Limit rule, rule names
are always prefaced by their corresponding Currency Code.
|
|
7
|
When you have finished, select "4 - Special Handling" to bring up the Manage Risk Policy: Rule Groups Special Handling screen.
|
|
8
|
Select the Special Handling rule you want to associate with the rule you are editing or creating.
|
|
9
|
When you are finished select "5 - Custom Input" to bring up the Manage Risk Policy: Rule Groups: Custom Input screen.
|
|
10
|
Select the Custom fields you want to include in your rule set.
|
|
11
|
When you have finished click "Save As" and name the new Risk Policy rule. Do not use any punctuation. Click "Save" to create a new version of an existing rule. If any
component of a rule has been updated to a new version, the system will not automatically select the newest version for a previously defined composite risk policy - you
must explicitly state which version to use as the default.
|
|
12
|
The new rule will appear on your list of rules.
|
|
Edit a Rule Group
|
To edit an existing rule group, follow the steps below:
|
|
Step
|
Action
|
|
1
|
Begin by displaying the rules you want to select from by choosing one of the following display options:
- Most Current
- Last 5 versions
- All versions
The appropriate rules will appear in the display box on the right side of the screen.
|
|
2
|
Select the rule that you want to edit by highlighting it.
|
|
3
|
Click on "Edit" to bring up the Manage Risk Policy: Policy Rule Groups: Risk Bands screen. Continue with Create New Rule Group - Step 2).
|
Rule Administration, 8.2
|
Overview
|
Rule Administration is used to define a Risk Policy by associating rules in a rule group and granting permissions to Users within a contract that will be using the
rules.
It is important to understand that rules granted within the GDM Rule Administration will be check against the Data Integration User ID permissions that were granted. If
the User does not have the appropriate permission they will not be able to perform the function.
|
|
Getting Started
|
Go to the Manage Risk Policy: Rule Grouping & Administration screen and follow the steps described below:
|
|
Step
|
Action
|
|
1
|
Click on "Manage Risk Policy" on the navigation bar on the left side of your screen. This will bring you to the Manage Risk Policy screen.
|
|
2
|
Click on "Risk Policy Rule Grouping & Administration" - this will bring you to the Manage Risk Policy: Risk Policy Rule Grouping & Administration
screen.
|
|
3
|
Select the name of the rule you will be granting User permissions for.
|
|
4
|
Click on "Administration" to go to the Rule Permissions Administration screen. From here you have two options:
- Set permissions for all Users within a contract
- Set permissions for individual Users
|
|
5
|
There are five permission options, described below:
|
|
Permission
|
Description
|
|
Edit Rule
|
To edit an existing rule, please note the following:
- If a User has Edit permission for a specific rule, they can view all decisions transacted using that rule.
- When permission is granted to Edit a rule, the User ID must also have permission granted to:
|
|
Update/
Review Decisions
|
Update/Review previous Decisions transacted using the rule. Unless the User has Edit or View Rule permission, they will only be able to see their own transactions.
|
|
View
Rule
|
View the rule details. This permission will also allow a User to view all transactions made with this rule by all other Users.
|
|
Make
Decisions
|
This grants a User the ability to use the rule to make decisions, and can be set as the User's default rule.
|
|
Contract Per-mission
|
Make Decision permission can be set as a default globally for the whole contract by doing the following:
|
|
1
|
Check the "Set Default" box to save it as the contract default.
|
|
2
|
Click the "Save" button.
|
|
User Per-missions
|
Permission can be set for individual users by doing the following:
|
|
1
|
Enter the User ID.
|
|
2
|
Check the appropriate boxes in the User input row.
|
|
3
|
Check the "Set Default" box to save it as the User default, if necessary.
|
|
4
|
Click the "Add User/Permissions" button to save your permissions.
|

|
5
|
Click "Save".
If a default was set at the contract level, and then one of the Users in the contract is added to another rule, a warning message will appear letting you know that the
default has been set at the contract level.
If a User has a default set at the User level for another rule, that rule must first be de-selected as the default before another default can be assigned.
|
|
Consumer Bureau Preference
|
If you are conducting Small Business transactions, you will need to set up your consumer bureau preferences so the Global DecisionMaker application can retrieve
consumer information from your credit bureau of choice.
You can establish up to two consumer bureau profiles. Your number one priority bureau will always be utilized first. If there is no match, the transaction will end and
a commercial driven decision will be returned. Your second choice consumer bureau will only be utilized if there are communication issues that prevent a successful
transaction.
Follow the steps below to establish your consumer bureau preferences within Global DecisionMaker:
|
|
Step
|
Action
|
|
1
|
Click on "Manage Risk Policy" on the navigation bar on the left side of your screen. This will bring you to the Manage Risk Policy screen.
|
|
2
|
Click on "Rule Grouping" - this will bring you to the Manage Risk Policy: Risk Policy Rule Grouping & Administration screen.
|
|
3
|
Select the name of the rule you will be establishing consumer bureau preferences for. If the rule you select is not a GDM Small Business rule (prefaced with "US-SB"),
you will not be able to set Consumer Bureau preferences.
|
|
4
|
Click the "Administration" button. This will take you to the Manage Risk Policy: Rule Permissions Administration screen.
|
|
5
|
Click "Consumer Bureau Preference". This will take you to the Manage Risk Policy: Consumer Bureau Profiles screen.
|
|
6
|
Select your first priority bureau using the "Priority" drop down menu.
|
|
7
|
Enter your consumer bureau subscriber information.
|
|
8
|
Repeat with your second priority bureau, if applicable.
|
Back to Table of Contents
Test Rules, Section 9
|
Overview
|
Global DecisionMaker provides a test harness for you to test the rules you have defined before you apply them to real-time transactions. After you have defined
the rules, test them by following the steps below.
Note: You cannot test GDM Small Business rules.
|
|
Step
|
Action
|
|
1
|
Click on "Manage Risk Policy" on the navigation bar on the left side of your screen. This will bring you to the Manage Risk Policy screen.
|
|
2
|
Click on "Test Rules", which will bring you to the Manage Risk Policy: Test Rules screen.
|
|
3
|
Your User ID will appear in the User field.
|
|
4
|
Select "2 - Rule To Test Input Values" and the Test Input screen will appear.
|
|
5
|
Begin by selecting the rule you want to test from the drop-down box.
|
|
6
|
Enter a Transaction ID to identify your test.
|
|
7
|
Select the Currency.
|
|
8
|
Enter the Requested Amount that you want to test.
|
|
9
|
Enter the Outstanding Balance.
|
|
10
|
Enter Custom Input Data, if appropriate.
|
|
11
|
Click on "3 - Test Case (Required)" and the Test Case selection screen will appear.
|
|
12
|
Select a Country from the drop-down list.
|
|
13
|
Select a Case Type
|
|
14
|
Click on "4 - Modify Request Parameters"
|
|
15
|
Make any necessary modifications to the test and click "Make Decision" to execute the test.
|
|
16
|
Test results will be generated using the defined criteria. Below is the result after testing an out of business case.
|
Back to Table of Contents
The Analytical Expertise Driving Global DecisionMaker, Section 10
D&B's Generic Credit Limit Guidelines, 10.1
|
Overview
|
D&B's Generic Credit Limit Guidelines evolved from D&B's experience in building D&B's Custom Credit Limit Analysis across a wide range of customer industry
segments. (To learn more about D&B's Analytical Expertise and to view a demo on D&B's Custom Credit Limit Analysis, go to our website at www.dnb.com). These
Generic Guidelines provide pre-determined benchmark credit limit matrices (decision tables) segmented by Industry Group and Employee Size that can help Users implement an
effective and competitive risk management process.
|
|
Development Process
|
The development process for D&B's Generic Credit Limit Guidelines consisted of combining the profile of historic credit usage by industry with risk assessment to
set reasonable Generic Credit Limit Guidelines. These Guidelines could then be used as benchmarks to provide virtually instant decisions on whether to complete a
transaction based on automated credit rules while helping reduce exposure to risk. The three steps of the process in developing these Guidelines included:
- Defining US Credit Need
- Evaluating Risk
- Determining a Credit Matrix
|
|
Defining U.S. Credit Need
Step 1
|
The first step in creating D&B's Generic Credit Limit was to determine what would be reasonable Credit Limit Guidelines to grant. When creating a D&B Customized
Credit Analysis we would normally calculate this amount using historical trends from a client's portfolio based on industry and company employee size. To create D&B's
Generic Credit Limit Guidelines we used a sample from D&B's vast trade database.
|
|
Evaluating Risk
Step 2
|
The second step in creating D&B's Generic Credit Limit Guidelines was to determine risk levels using Local Country Delinquency Scores and or Local Country Failure
Risk Scores, when available. For those countries that currently do not offer a local country predictive scoring solution the D&B PAYDEX® (D&B payment
index) and/or D&B Rating® were used.
|
|
Determining a Credit Matrix
Step 3
|
The third step in creating D&B's Generic Credit Limit Guidelines combined the Credit Need (Step One) and Risk Evaluation (Step Two) to determine the Generic Credit
Limit Guidelines (decision tables). The result was the creation of an Aggressive and a Conservative Matrix. Credit dollars for Global Buyers were based on U.S.
Aggressive Credit Limit Guidelines. Local Country Risk Predictors defined the risk component.
|
Step One: Defining U.S. Credit Limit Guidelines, 10.2
|
Overview
|
The first step in creating D&B's Generic Credit Limit Guidelines was to determine what would be reasonable Credit Limit Guidelines to grant. To create D&B's
Generic Credit Limit Guidelines we used a sample from D&B's vast trade database.
|
|
Industry Segmentation
|
The Analysis File, for D&B's Generic Credit Limit Guidelines, was segmented into industry groups and the distribution of dollars was analyzed and presented as
percentiles (90th, 75th, and 50th). This provided the historical credit usage that enabled us to identify credit need and risk cutoffs. Our analysis showed that 75% of
Manufacturing Industry accounts in our Analysis File would not be constrained if we only granted them $10,000 in credit.
|
|
Percentiles Defined
|
The percentile illustrates where a company falls among businesses in D&B’s U.S. trade file. In the case of D&B’s Generic Credit Limit the
percentiles were used to present the distribution of dollars by industry and employee size to determine spend.
|
|
Definition of Constrained
|
By constrained we mean that those accounts have a higher credit need than you will approve. For example, they will request more credit than you are willing to grant.
For some of these cases you may wish to establish override exception rules (e.g. your best customers).
|
|
Employee Size Segmentation
|
The second dimension in defining credit need was segmentation by employee size. Our analysis found that larger companies tend to conduct larger transactions thus
customers should expect this size of business to request a higher amount of credit. Alternatively, small businesses tend to have smaller credit needs.
|
|
Benchmark Credit Usage
|
After completing the Industry Segment and Employee Size segmentation, we combined both of these dimensions of credit need to establish the benchmark for credit usage.
The table below illustrates the distribution of historic credit usage for the Construction and Manufacturing Industries. The distribution is represented by 7 breaks: a
minimum, 25th, 50th, 75th, 90th, 95th percentiles and a maximum value. The distribution in combination with risk factors was used to determine the Generic Credit Limit
Guidelines.
|
The distribution of historic credit usage for the Construction and Manufacturing Industries
|
Industry Segment
|
Size Segment
|
Number of Accounts
|
Minimum
|
25th Percen
tile
|
50th Percen
tile
|
75th Percen
tile
|
90th Percen
tile
|
95th Percen
tile
|
Maximum
|
|
Construction
|
NA-9
|
300,017
|
$50
|
$100
|
$500
|
$2,500
|
$15,000
|
$25,000
|
$3,000,000
|
|
Construction
|
10-19
|
59,169
|
$50
|
$500
|
$2,500
|
$15,000
|
$30,000
|
$55,000
|
$2,000,000
|
|
Construction
|
20-49
|
39,095
|
$50
|
$1,000
|
$5,000
|
$25,000
|
$55,000
|
$100,000
|
$2,000,000
|
|
Construction
|
50-99
|
10,862
|
$50
|
$2,500
|
$15,000
|
$40,000
|
$100,000
|
$200,000
|
$3,000,000
|
|
Construction
|
100-249
|
4,797
|
$50
|
$7,500
|
$25,000
|
$85,000
|
$250,000
|
$400,000
|
$5,000,000
|
|
Construction
|
250-499
|
1,131
|
$50
|
$15,000
|
$45,000
|
$200,000
|
$400,000
|
$600,000
|
$4,000,000
|
|
Construction
|
500+
|
709
|
$50
|
$15,000
|
$60,000
|
$250,000
|
$600,000
|
$900,000
|
$4,000,000
|
|
Manufacturing
|
NA-9
|
173,990
|
$50
|
$100
|
$500
|
$1,000
|
$7,500
|
$15,000
|
$15,000,000
|
|
Manufacturing
|
10-19
|
57,211
|
$50
|
$500
|
$2,500
|
$7,500
|
$25,000
|
$35,000
|
$7,000,000
|
|
Manufacturing
|
20-49
|
53,959
|
$50
|
$1,000
|
$5,000
|
$20,000
|
$45,000
|
$85,000
|
$8,000,000
|
|
Manufacturing
|
50-99
|
23,660
|
$50
|
$5,000
|
$15,000
|
$40,000
|
$100,000
|
$200,000
|
$10,000,000
|
|
Manufacturing
|
100-249
|
16,738
|
$50
|
$10,000
|
$30,000
|
$85,000
|
$200,000
|
$400,000
|
$20,000,000
|
|
Manufacturing
|
250-499
|
6,069
|
$50
|
$20,000
|
$55,000
|
$200,000
|
$400,000
|
$750,000
|
$15,000,000
|
|
Manufacturing
|
500+
|
7,162
|
$50
|
$45,000
|
$200,000
|
$500,000
|
$1,000,000
|
$2,000,000
|
$50,000,000
|
|
Multivariate Segmentation
|
Multivariate segmentation provides a powerful analytical foundation to differentiate the credit need among different business segments as presented Table 1 above:
Looking at companies with 10-19 employees we see a differing level of credit need based on the industry segmentation. As shown above, for Manufacturing Companies, the 75th
percentile is at $7,500 while a Construction Company with 10-19 employees at the same percentile is at $15,000.
|
Step Two: Defining Risk Levels, 10.3
|
Overview
|
The second step in creating D&B's Generic Credit Limit Guidelines was to determine risk levels using Local Country Delinquency scores and/or Local Country Failure
Risk Scores, when available. For those countries that currently do not offer a local country predictive scoring solution the PAYDEX (D&B payment index) and/or D&B
Rating® were used.
|
|
D&B Delinquency Score Defined
|
The D&B Delinquency Score is a statistically modeled score (range 101-660) indicating the risk of severely delinquent payments based on the information in
D&B’s file. The higher the Delinquency Score the lower the probability of payment delinquency. For example, the U.S. Delinquency Score predicts the
likelihood that a company will pay its bills in a severely delinquent manner (+90 days past term) over the next 12 months, based on the information in Dun &
Bradstreet’s files. Severely delinquent is defined as a business with at least 25% of its payments slow and at least 10% of its payments 90 days or more past
due). Delinquency Scores are not calculated in the U.S. for those businesses designated as "Discontinued at This Location," "Open Bankruptcy or Higher Risk .
These records are automatically assigned a score of zero (0).
Note: Delinquency Scores in other countries may be defined somewhat differently, but the underlying statistical principles remain the same.
|
|
D&B Delinquency Score Percentile
|
The D&B Delinquency Score Percentile ranking illustrates where a company falls among businesses in the D&B information base, and is most effectively used by
customers to rank order their portfolios from highest to lowest risk of severe payment delinquency. The Percentile ranking is based on a 1 - 100 scale, where a 1
represents businesses that have the highest probability of severe delinquency, and a 100 that represents businesses with the lowest probability of severe delinquency.
|
|
Failure Risk Score Defined
|
D&B’s Failure Risk Scores (values 1,001 – 1,875) predict the probability of severe financial distress or failure. This score enables a customer to
utilize more granular cutoffs to drive their automated decision-making process. Failure Risk Scores are not calculated in the U.S. for those businesses designated as
"Discontinued at This Location," "Open Bankruptcy or Higher Risk. These records are automatically assigned a score of zero (0).
|
|
Failure Risk Score Percentile
|
The Failure Risk Score Percentile ranking of 1 - 100 indicates where a company falls among businesses in the local D&B information base, and is most effectively
used by customers to rank order their portfolios from highest to lowest risk of business failure. A percentile score of 1 represents businesses that have the highest
probability of financial stress, and a 100 that represents businesses with the lowest probability of financial stress. Percentile rankings are available from Western
Europe, the U.S. and Australia.
|
|
D&B PAYDEX®
|
The PAYDEX (D&B payment index) assesses the current payment performance of a business. Based on the trade experiences in D&B’s database, the index
corresponds to an average days beyond terms or within terms enabling you to assess when your existing or potential customers are likely to pay. Derived from a
dollar-weighted average of a company’s combined individual payment experiences, it ranges from 0 – 100 with higher indexes representing businesses which pay
their bills more promptly.
|
|
D&B Rating®
|
The D&B Rating® assesses a company’s overall creditworthiness. It is made up of two components: a Rating Classification, which indicates a range of a
company’s worth as computed by D&B or number of employees and a Composite Credit Appraisal, which reflects D&B’s assessment of overall creditworthiness
(risk of default and slow pay).
|
|
Projected Performance Tables
|
Each D&B predictive score has a projected performance table. The projected performance table for a delinquency score shows how well a score identifies good and bad
(+90 days past terms) paying accounts. For a failure score it would show how well a score predicts business failure. The table is built on a random sample of firms and
shows how many accounts are found in each score/percentile range and the delinquency or failure characteristics of those score ranges. The Projected Performance Tables
provide information you need to rationally determine cutoff scores/percentiles when you want to customize the default Risk Bands found in Global
DecisionMaker. For more information on Projected Performance Tables please go to the Data Integration Toolkit website at http://toolkit.dnb.com.
|
|
Local Country Delinquency & Failures Scores
|
When available we used a Local Country Delinquency Score and the Local Country Failure Score to set up a process to monitor both short and long-term risk. When
you set risk bands using two variables, the riskiest classification is used to establish the high-risk.
The diagram below provides a view of the default Risk Bands that are created when Local Country Delinquency and Failure Risk Scores are available. By using the
sliders Users can change the Failure Risk Rates based on their tolerance for risk, business processes and objectives.
|
|
Additional Local Country Scores
|
If a Local Country Delinquency Score is not available then a Local Country Failure Score is used to monitor risk. Conversely, if a Local Country Failure Score is not
available then a Local Country Delinquency, PAYDEX or D&B Rating® would be used.
|
Step Three: Determining the Credit Matrix, 10.4
|
Overview
|
The third step in creating D&B's Generic Credit Limit Guidelines combined Step One: Credit Need and Step Two: Risk Evaluation to determine the Generic Credit Limit
Guidelines (decision tables).
|
|
US Generic Credit Limit Guidelines
|
There are two types of Generic Credit Limit Guidelines that were developed based on a customer’s tolerance for risk:
- Conservative Credit Limit Guidelines – fewer accounts will be automatically approved at requested credit amounts.
- Aggressive Credit Limit Guidelines – more accounts will be automatically approved at requested credit amounts.
|
|
Conservative Credit Limit Matrix
|
The following example of the Conservative Credit Limit Matrix illustrates within specific industry and employee size segments, the dollar amount that will be approved
among businesses at different risk levels. These dollar guideline amounts are based on a historical analysis of credit demand of customers in D&B's U.S. trade
database who have a similar profile in respect to employee size and industry. The Guidelines do not address whether a particular business can pay that amount or whether a
particular customer's total credit limit has been achieved (based on aggregating their total trade experiences and outstanding balances, i.e., credit utilization).
|
Conservative Credit Limit Matrix for D&B's Generic Credit Limit Guidelines
|
Industry Segment
|
Size Segment
|
High Risk
|
High-Moderate Risk
|
Moderate Risk
|
Low Risk
|
|
Construction
|
NA-9
|
$0
|
$100
|
$2,500
|
$15,000
|
|
Construction
|
10-19
|
$0
|
$500
|
$15,000
|
$30,000
|
|
Construction
|
20-49
|
$0
|
$1,000
|
$25,000
|
$55,000
|
|
Construction
|
50-99
|
$0
|
$2,500
|
$40,000
|
$100,000
|
|
Construction
|
100-249
|
$0
|
$7,500
|
$85,000
|
$250,000
|
|
Construction
|
250-499
|
$0
|
$15,000
|
$200,000
|
$400,000
|
|
Construction
|
500+
|
$0
|
$15,000
|
$250,000
|
$600,000
|
|
Manufacturing
|
NA-9
|
$0
|
$100
|
$1,000
|
$7,500
|
|
Manufacturing
|
10-19
|
$0
|
$500
|
$7,500
|
$25,000
|
|
Manufacturing
|
20-49
|
$0
|
$1,000
|
$20,000
|
$45,000
|
|
Manufacturing
|
50-99
|
$0
|
$5,000
|
$40,000
|
$100,000
|
|
Manufacturing
|
100-249
|
$0
|
$10,000
|
$85,000
|
$200,000
|
|
Manufacturing
|
250-499
|
$0
|
$20,000
|
$200,000
|
$400,000
|
|
Manufacturing
|
500+
|
$0
|
$45,000
|
$500,000
|
$1,000,000
|
|
Aggressive Credit Limit Matrix
|
The following example of the Aggressive Credit Limit Matrix illustrates within specific industry and employee size segments, the dollar amount that will be approved
among businesses at different risk levels. These dollar guideline amounts are based on a historical analysis of credit demand of customers in D&B's trade
database who have a similar profile in respect to employee size and industry. The Guidelines do not address whether a particular business can pay that amount or whether a
particular customer's total credit limit has been achieved (based on aggregating their total trade experiences and outstanding balances, i.e., credit utilization.
|
Aggressive Credit Limit Matrix for D&B's Generic Credit Limit Guidelines
|
Industry Segment
|
Size Segment
|
High Risk
|
High-Moderate Risk
|
Moderate Risk
|
Low Risk
|
|
Construction
|
NA-9
|
$0
|
$500
|
$15,000
|
$25,000
|
|
Construction
|
10-19
|
$0
|
$2,500
|
$30,000
|
$55,000
|
|
Construction
|
20-49
|
$0
|
$5,000
|
$55,000
|
$100,000
|
|
Construction
|
50-99
|
$0
|
$15,000
|
$100,000
|
$200,000
|
|
Construction
|
100-249
|
$0
|
$25,000
|
$250,000
|
$400,000
|
|
Construction
|
250-499
|
$0
|
$45,000
|
$400,000
|
$600,000
|
|
Construction
|
500+
|
$0
|
$60,000
|
$600,000
|
$900,000
|
|
Manufacturing
|
NA-9
|
$0
|
$500
|
$7,500
|
$15,000
|
|
Manufacturing
|
10-19
|
$0
|
$2,500
|
$25,000
|
$35,000
|
|
Manufacturing
|
20-49
|
$0
|
$5,000
|
$45,000
|
$85,000
|
|
Manufacturing
|
50-99
|
$0
|
$15,000
|
$100,000
|
$200,000
|
|
Manufacturing
|
100-249
|
$0
|
$30,000
|
$200,000
|
$400,000
|
|
Manufacturing
|
250-499
|
$0
|
$55,000
|
$400,000
|
$750,000
|
|
Manufacturing
|
500+
|
$0
|
$200,000
|
$1,000,000
|
$1,000,000
|
|
Measuring Performance
|
To ensure that the Generic Credit Limit Guidelines meet the needs of our customers, we evaluated the performance of the Credit Limit Guidelines on various types of
portfolios. Overall results show the matrix performed consistently in terms of overall referrals:
- Lower percentage of low risk referrals
- High percentage of high risk to moderate referrals
|
Back to Table of Contents
A Word about Predictive Scores, Section 11
D&B Delinquency Score
|
Delinquency Score
|
The D&B Delinquency Score is a statistically modeled score indicating the risk of severely delinquent payments based on the information in D&B's file. The
higher the Delinquency Score the lower the probability of payment delinquency. For example, the US Delinquency Score predicts the likelihood that a company will pay its
bills in a severely delinquent manner (+90 days past term) over the next 12 months, based on the information in Dun & Bradstreet's files. Severely delinquent is
defined as a business with at least 25% of its payments slow and at least 10% of its payments 90 days or more past due.
Note: Delinquency Scores in other countries may be defined somewhat differently, but the underlying statistical principles remain the same.
|
|
Percentile Ranking
|
The D&B Delinquency Score Percentile ranking illustrates where a company falls among businesses in the D&B information base, and is most effectively used by
customers to rank order their portfolios from highest to lowest risk of severe payment delinquency. The Percentile ranking is based on a 1 - 100 scale, where a 1
represents businesses that have the highest probability of severe delinquency, and a 100 that represents businesses with the lowest probability of severe delinquency.
|
D&B's Failure Risk Scores
|
Failure Risk Score
|
D&B's Failure Risk Score predicts the probability of severe financial distress or failure. This score enables a customer to utilize more granular cutoffs to drive
their automated decision-making process.
|
|
Percentile Ranking
|
The Failure Risk Score Percentile ranking of 1 – 100 indicates where a company falls among businesses in the local D&B information base, and is most
effectively used by customers to rank order their portfolios from highest to lowest risk of business failure. A percentile score of 1 represents businesses that have the
highest probability of financial stress, and a 100 that represents businesses with the lowest probability of financial stress. Percentile rankings are available from
Western Europe, the US and Australia. For Japan, the Failure Score (values 0 – 10) predicts the probability of closure (failure) in the next twelve months. In
Canada, the failure score is a stability score (values 1-10) which predicts the probability of business closure.
|
|
Note
|
Note that Failure Risk Scores, Delinquency Scores, and Small Business Risk Account Score are not calculated in the US for those businesses designated as "Discontinued
at This Location," "Open Bankruptcy or Higher Risk. These records are automatically assigned a score of zero (0).
|
Small Business Risk Account Score
|
Small Business Risk Account Score
|
The Small Business Risk Account Score - powered by Fair, Isaac - combines D&B's powerful commercial database and decisioning capabilities with Fair, Isaac's
statistical and analytical expertise in using business and consumer data to build small business predictive models. The result is a suite of new account scorecards that
are highly effective in predicting the potential delinquent behavior of small business applying for trade credit terms.
|
|
Percentile Ranking
|
The Small Business Risk Account Score Percentile ranking of 1 - 100 indicates where a company falls among businesses in the local D&B information base, and is most
effectively used by customers to rank order their portfolios from highest to lowest risk of business failure. A percentile score of 1 represents businesses that have the
highest probability of payment delinquency, and a 100 that represents businesses with the lowest probability of payment delinquency.
|
|
Note
|
The Small Business Risk Account Score is only available on U.S. businesses.
|
D&B Rating®
|
Assess Credit Worthiness
|
The D&B Rating® assesses a company's overall credit worthiness. It is made up of two components: a Rating Classification, which indicates a range of a company's
worth as computed by D&B or number of employees and a Composite Credit Appraisal, which reflects D&B's assessment of overall creditworthiness (risk of default and
slow pay).
|
D&B PAYDEX® Score
|
D&B Payment Index
|
The D&B PAYDEX® (D&B payment index) assesses the current payment performance of a business. Based on the trade experiences in D&B's database, the index
corresponds to an average days beyond terms or within terms enabling you to assess when your existing or potential customers are likely to pay. Derived from a
dollar-weighted average of a company's combined individual payment experiences, it ranges from 0 - 100 with higher indexes representing businesses which pay their bills
more promptly. The following table explains the meaning of PAYDEX in Denmark, Finland, and Sweden.
|
|
D&B PAYDEX®
|
Payment Habit
|
|
90
|
Anticipate / Discount
|
|
80
|
Prompt
|
|
75
|
5 days beyond terms
|
|
70
|
10 days beyond terms
|
|
65
|
15 days beyond terms
|
|
60
|
20 days beyond terms
|
|
55
|
25 days beyond terms
|
|
50
|
30 days beyond terms
|
|
45
|
35 days beyond terms
|
|
40
|
40 days beyond terms
|
|
35
|
45 days beyond terms
|
|
30
|
50 days beyond terms
|
|
25
|
55 days beyond terms
|
|
20
|
60 days beyond terms
|
|
15
|
65 days beyond terms
|
|
10
|
70 days beyond terms
|
|
5
|
75 days beyond terms
|
|
0
|
80+ days beyond terms
|
Back to Table of Contents
Appendix - Default Country Currency
|
Currency
|
Country
|
Currency
Description
|
|
ANG
|
NL: Netherlands
|
Netherlands Antillean Guilder
|
|
AUD
|
AU: Australia
|
Australian Dollar
|
|
CAD
|
CA: Canada
|
Canadian Dollar
|
|
COP
|
CO: Columbia
|
Colombian Peso
|
|
DKK
|
DK: Denmark
|
Danish Krone
|
|
EUR
|
BE: Belgium
FR: France
MC: Monaco
DE: Germany
IE: Ireland
IT: Italy
SM: San Marino
LU: Luxembourg
NL: Netherlands
PT: Portugal
ES: Spain
AD: Andorra
FN: Finland
EE: Estonia
|
Euro
|
|
GBP
|
GK: United Kingdom of Great Britain and Northern Ireland
|
Pound Sterling
|
|
JPY
|
JP: Japan
|
Yen
|
|
NOK
|
NO: Norway
|
Norwegian Krone
|
|
NZD
|
NZ: New Zealand
|
New Zealand Dollar
|
|
SEK
|
SE: Sweden
|
Swedish Krone
|
|
VEB
|
VE: Venezuela
|
Bolivar
|
|
USD
|
US: United States
|
US Dollar
|
Back to Table of Contents
|